Results 1 to 6 of 6

Thread: I am looking to re-dye my lambskin leather Chanel purse!

  1. #1
    Join Date
    Feb 2007
    Location
    Greater Vancouver, Canada.
    Posts
    5,097

    Default I am looking to re-dye my lambskin leather Chanel purse!

    I came across your posts about leather redying on this forum thread:
    http://leathercleaningrestorationfor...read.php?p=966
    I am looking to re-dye my lambskin leather Chanel purse, of which I have attached a few pictures of. Based on your response to the person in the thread above, I believe I would need napaColor84 in Black-12, d'Oil4.4, and napaTop78S. Please let me know what your prices are for those three products. Also, please take a look at the pictures I have attached to my email to see if those products would indeed be what is needed in order to redye my bag. If not, I would very much appreciate if you could tell me which products you would recommend instead. The leather, as you can see in the pictures, is not a very porous leather like the Chanel bag in the above-mentioned forum post you posted on, so I was thinking the products you recommended for lambskin products may be what I need - I may be wrong, and would like for you to take a look at the pictures and give your assessment and prices of products needed. Thanks!

    #1


    #2


    #3


    #4

  2. #2
    Join Date
    Feb 2007
    Location
    Greater Vancouver, Canada.
    Posts
    5,097

    Default

    Pictures Observation:

    Picture #1
    Friction rubs is the main cause of the lost of color to the logo.

    Picture #2
    The lighter color may be from unknown spills or soiling.

    Picture #3
    Scuff and wear due to usage

    Picture #4
    Edges worn from friction rubs and creases

    Comprehensive sequence of process recommended for re-dyeing:

    1st phase – Restorative Cleaning
    Restorative cleaning is to remove general foreign contamination preparing the leather for re-dyeing. Specialty products may be required to further spot clean specific stains. The main product is Prep-4.4 (d’Oil4.4) follows by Cleaner-3.8 then Rinse-3.0

    2nd phase – Hydrating
    For rejuvenating the leather structure, the optimum level of hydrating is when moisture oozes out of the leather structure when it is gently squeeze with finger and thumb. For reducing of surface tension surface spray, towel extracts and inspect for an even appearance suffice.
    The purpose of hydrating is to rejuvenate the leather structure; 1) to relax the leather structure of its creases and straighten the edges especially to picture #4; 2) to help wick up penetrated stains if any; 3) to activate the dormant dyestuff to surface; 4) to charge the protein fiber positive for an effective softening of the leather and re-dyeing; 5) to ensure an even appearance prior to fatliquoring or re-dyeing.

    3rd phase – Fatliquor Replenishing
    Stiffness, creases and wrinkles develop when leather moisture contents diminishes and in extreme cases cracks. Fatliquor is such content that makes the leather soft, supple and strong and it is recommended to be periodically replenished. Fatliquor is composed of fat and oil encased in water; the fat gives fullness to the leather; the oil lubricates the fibrils so that they are lubricated and slide easily over another when compressed, stretched or flexed thus prevents breaking. The encasing water breaks free and leaves breathing space in the inter-fibrillary spaces.

    4th phase – Structural Repairs
    This structural repair is recommended to worn edges especially to picture #4. Impregnator-26 is added to the Aniline Dye-21 to seal, to fill and to tighten the leather structure in a 2-in-1 process.

    5th phase – Re-dyeing
    Re-dyeing with Aniline Dye-21 is straight forward with a lint-free rag as provided. Dyeing is to stain the protein fiber (more effectively if already been positive charged by the Hydrator-3.3). The dyes will go to all topcoat worn areas, but easily rub-off on the topcoat finish. To coat over the existing topcoat would require the addition of Adhesor-73 (10% to 30%) to the Aniline Dye-21.

    6th phase – Topcoating
    Topcoating will knock off the bronze effect of the dye and seal in the dyes. To smoothen the finish sanding with 1200/1500grit in between coating improves the smoothness. (Never sand on leather direct).

    7th phase – Rub Resistant Protection
    Most of the presence high wear areas will be reduce with this non-stick rub resistant protection with Protection-B+

    Roger Koh
    [email protected]

  3. #3
    Join Date
    Feb 2007
    Location
    Greater Vancouver, Canada.
    Posts
    5,097

    Default

    Products you may need:
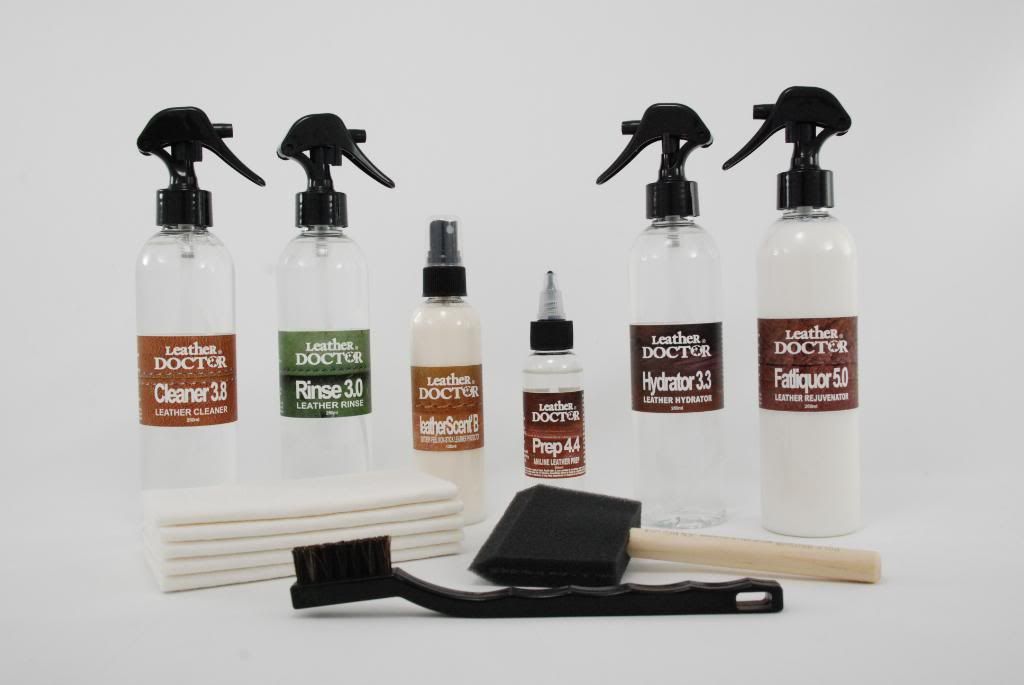

    Leather Doctor® Kit A3 : Aniline Leather Standard Care Kit


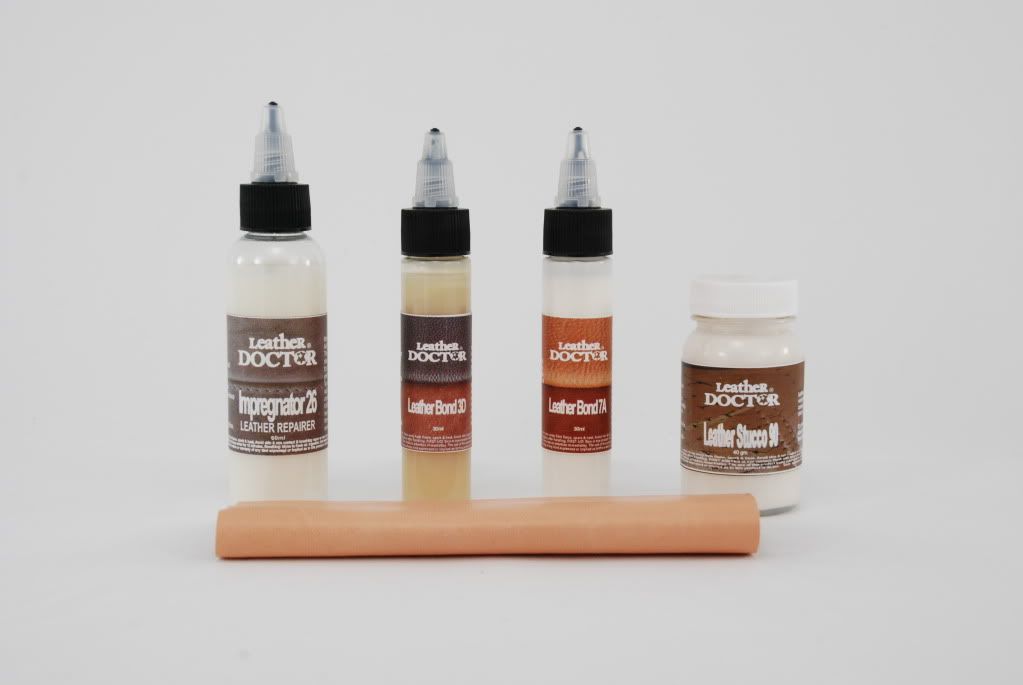
    Leather Repairer (5):
    Leather Structure Impregnator,
    Leather Bond,
    Leather Bonding Aid,
    Leather Stucco &
    Leather Patch.

    Leather Doctor® Impregnator-26
    It’s a Leather Surface Repairer for Pigmented and Aniline leather types.
    This is a protein compact resin blend compound impregnator.
    It’s for impregnating worn leather grains and micro cracks.
    It’s to seal, strengthen and leveling out uneven absorption for further coating process.
    It fills and tightens with good leveling properties that is film forming for improve abrasion resistance.
    This product is also available in concentrate to be cut with distilled water at a ratio of 1: 0.5.
    Thus a quart makes 1.5 quarts of Ready-To-Use product to save on shipping.
    Ready-To-Use packing sizes are available in 60ml, 120ml, and 250ml and in Quart.
    Concentrate packing sizes are available in quart (1.5 quarts).
    Note:
    For color skin repairs add colors accordingly up to ratio 1: 1.
    Instruction:
    1] Shake well, pad to saturate all weak and absorbent areas.
    2] Concentrate on weak areas otherwise wipe off unnecessary excess to reduce buildup.


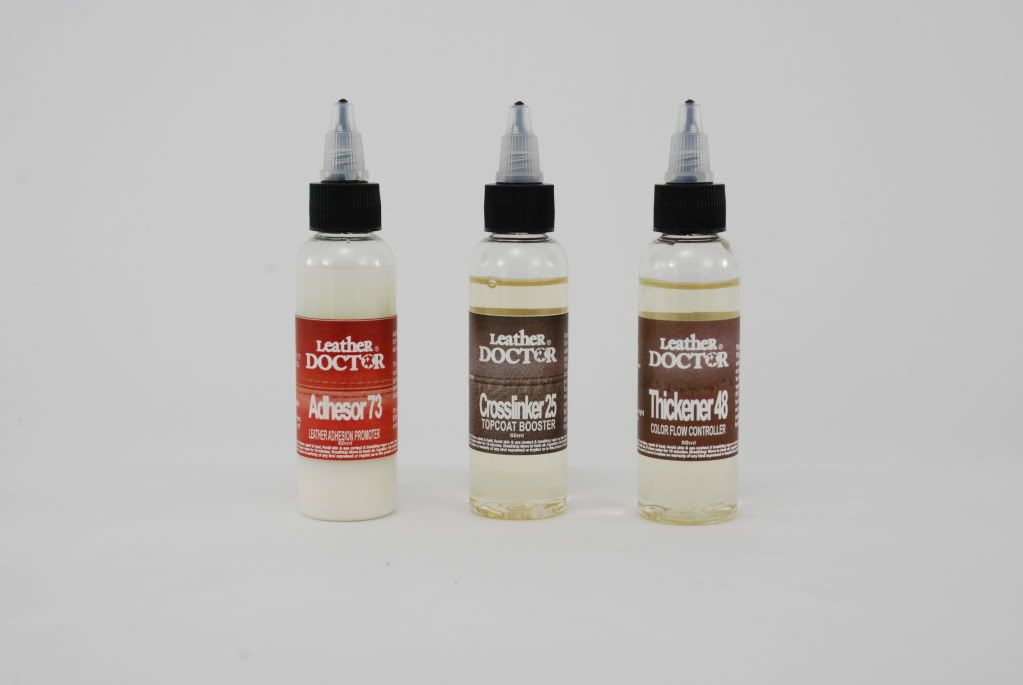
    Leather Dyeing & Coloring Auxiliary (3):
    Leather Adhesion Coating,
    Leather Topcoat Crosslinker &
    Leather Colorcoat Flow Controller.

    Leather Doctor® Adhesor-73
    It’s an auxiliary for Pigmented and Aniline leathers refinishing.
    This is an aqueous compact resin adhesion promoter to ensure proper adhesion prior to color coating.
    It's also added to Aniline Dye-21 for dye coating absorption resistant areas to reduce color blotchiness.
    And it’s also used after WaxEffect8.6 prior to top coating.
    This product is also available in concentrate to be cut with distilled water at a ratio of 1: 1.
    Thus a quart makes 2 quarts of Ready-To-Use product to save on shipping.
    Ready-To-Use packing sizes are available in 60ml, 250ml and in Quart.
    Concentrate packing sizes are available in quart (2 quarts).
    Note:
    Strip clean of foreign contamination prior to application – use Prep-7.7 > Cleaner-3.8 > Rinse-3.0.
    Instruction:
    1] Shake well, hand padding preferred to ensure better anchorage for non-absorbent leathers.
    2] Fine airbrushing for absorbent leathers to reduce patchiness.
    3] Let dry naturally or speed dry with blow dryer.
    3] Proceed with choice of further coating.


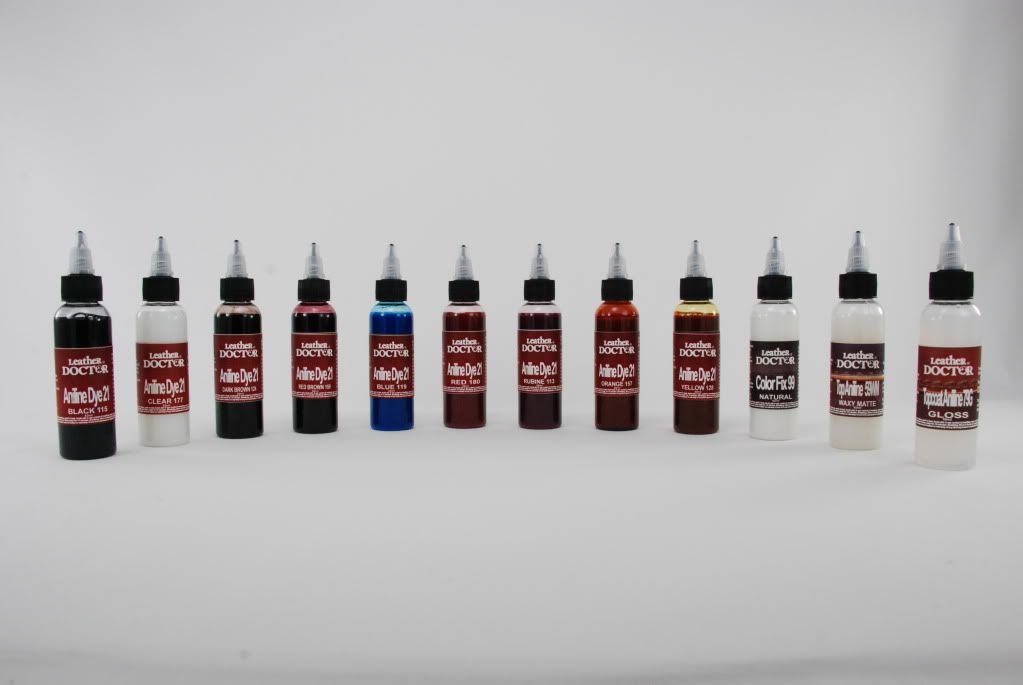
    Aniline Leather Dyeing System (12):
    Aniline Black Dye,
    Aniline Orange Dye,
    Aniline Red Dye,
    Aniline Red-Brown Dye,
    Aniline Yellow Dye,
    Aniline Dark-Brown Dye,
    Aniline Rubine Dye &
    Aniline Blue Dye.
    Aniline Natural Topcoat,
    Aniline Waxy Matte Topcoat &
    Aniline Gloss Topcoat.


    Leather Doctor® Aniline Dye-21
    It’s for staining absorbent aniline leathers.
    This is a new generation aqueous transparent staining aniline dyestuff that is more lively and brilliant than most liquid dyes.
    It’s to provide a more superior light fastness and fades resistance than most standard liquid dyes.
    For coating aniline leathers that has existing topcoating; add up to 30% Adhesor-73 to even out appearance.
    Standard colors available in Black-115, Orange-157, Red-180, Red-Brown-159, Yellow-128, Dark-Brown-124, Rubine-113 and Blue-119.
    This product is also available in concentrate to be cut with distilled water at a ratio of 1: 8.
    Thus a 120ml makes 1.14 quarts of Ready-To-Use product to save on shipping.
    Ready-To-Use packing sizes are available in 60ml, 250ml and in quart.
    Concentrate packing sizes are available in 120ml (1.14), 250ml (2.37) and quart (9 quarts).
    Instruction:
    1] Prep clean - use Prep-4.4 follows by Cleaner-3.8 then Rinse-3.0.
    2] When prep clean using Degreaser-2.2 either rinse with Acidifier-2.0 for bleeding control or with standard Rinse-3.0.
    3] Inspection when dry – use leather Eraser-4 to remove wick-up soiling particulates.
    4] Shake well before application.
    5] For adhesion surface coating - add 10 to 30% Adhesor-73 (less is better).
    6] Airbrush to even out the color avoiding streaks or drips.
    7] Blow dry in-between coats until desired result is achieved.
    8] Leather rejuvenation – use Hydrator-3.3 follows with Fatliquor-5.0.
    9] Topcoat protection to match original luster - use Aniline Topcoat-89N(natural), Aniline Topcoat-59M (waxy matte) or Aniline Topcoat-79G (gloss).

    Leather Doctor® Aniline Topcoat-79G
    It’s a gloss finish for upholstery Aniline leathers.
    This is an aqueous fine particular size urethane resin emulsion topcoat.
    It’s to protect aniline dyestuff with excellent toughness and flexibility.
    This product is also available in concentrate to be cut with distilled water at a ratio of 1: 1.
    Thus a quart makes 2 quarts of Ready-To-Use product to save on shipping.
    Ready-To-Use packing sizes are available in 60ml, 250ml and in quart.
    Concentrate packing sizes are available in quart (2 quarts).
    Instruction:
    1] Apply after Aniline Dye-21; otherwise prep clean - use Prep-4.4 follows with Cleaner-3.8 then Rinse-3.0.
    2] Pad or fine spray without streaks or drips.
    3] Non-Stick, Rub-Resistance buttery-feel protection with a classic leather scent - use Protection-B+ (leather Scent-B).
    Last edited by Roger Koh; 12-01-2011 at 01:26 PM.

  4. #4
    Join Date
    Feb 2007
    Location
    Greater Vancouver, Canada.
    Posts
    5,097

    Default

    I have cleaned my purse using the instructions you provided below and have attached pictures of my purse taken afterward. Please let me know the next instructions needed for dying the purse. Thanks!

    #1


    #2


    #3

  5. #5
    Join Date
    Feb 2007
    Location
    Greater Vancouver, Canada.
    Posts
    5,097

    Default

    If you have done the previous phase accordingly, then we should be at the 4th phase.

    However, you may want to fill up the purse in shape, which is stuffing it up to the fullest. It’s also easier to work on these folds; in fact should have done it prior to cleaning it and leave the stuffing until completion of the project.

    So, we are at phase 4th. Identify the weak or worn leathers with your finger tips, especially the edges to tighten up the leather structure. Suggest simple procedure to accomplish the weak structural repairs is as follows:

    1] On a plastic cap or plate drip ratio 1: 1 Impregnator-26/Dye-21, mix well and use cotton swab to detail it and smooth it using the smooth edge of a teaspoon. Leave to natural dry or fast dry using hair dryer. This can be repeated as long as the leather absorb it, in between smoothening is done with 1000 to 1500grit sandpaper. Do not overdo it as less is more natural. Note: do not allow it to built-up; this product is not supposed to be seen from the surface.

    4th phase – Structural Repairs
    This structural repair is recommended to worn edges especially to picture #4. Impregnator-26 is added to the Aniline Dye-21 to seal, to fill and to tighten the leather structure in a 2-in-1 process.

    Let’s see some pictures…

  6. #6
    Join Date
    Feb 2012
    Posts
    564

    Default

    Hey Roger,

    This is Oanh. Sorry for taking so long to send you the pictures of the finished results of my purse after dying it. It took longer than expected because I dyed it with a couple of layers of dye and topcoat, but I LOVE the results and wanted to share them with you. I will definitely be ordering your products again in the future and wanted to thank you again for your help with the process. Thanks!!


    #1


    #2


    #3


    #4
    Last edited by Questions!; 03-22-2012 at 11:12 PM.

Thread Information

Users Browsing this Thread

There are currently 1 users browsing this thread. (0 members and 1 guests)

Posting Permissions

  • You may not post new threads
  • You may not post replies
  • You may not post attachments
  • You may not edit your posts
  •