From pictures, this bag is identified as “Aniline” leather types; the problem is probably grease/oil related or alkaline related darkening effect. You can trouble shoot from the Aniline Problem Solving Guide below… that recommend 1st step is to use Degreaser-2.2 follows with 2nd step using Rinse-3.0.
Since you have the SA3 Kit, what you need for this problem is mostly likely only the Degreaser-2.2 to go over the problem accentuated. Prep-7.7 with a pH of 7.7 is not safe for aniline leathers. Leather average pH is between 3 and 5. Although sweat is mildly acidic, it’s the urea content that will shift alkaline as it ages. That is why the Degreaser-2.2 is designed in such low pH to neutralize the alkaline contamination from body contact. Bring back the pH of the leather to its neutral of 3 – 5. The general instructions for degreasing mentioned covers extreme cases. Yours is only the beginning – It is using the Prep-7.7 that makes the situation worse. To improve the situation is to clean it thoroughly with Cleaner-3.8 with brush agitation to remove all traces of the Prep-7.7 residue, follows with Rinse-3.0 until it is squeaky feel. Leave it dry – dry brush any wick up residue and stretching the leather will lighten up the color.
Let us know how much improvement you can achieve from these tips. Show picture and we can go from there…
Roger Koh
[email protected]
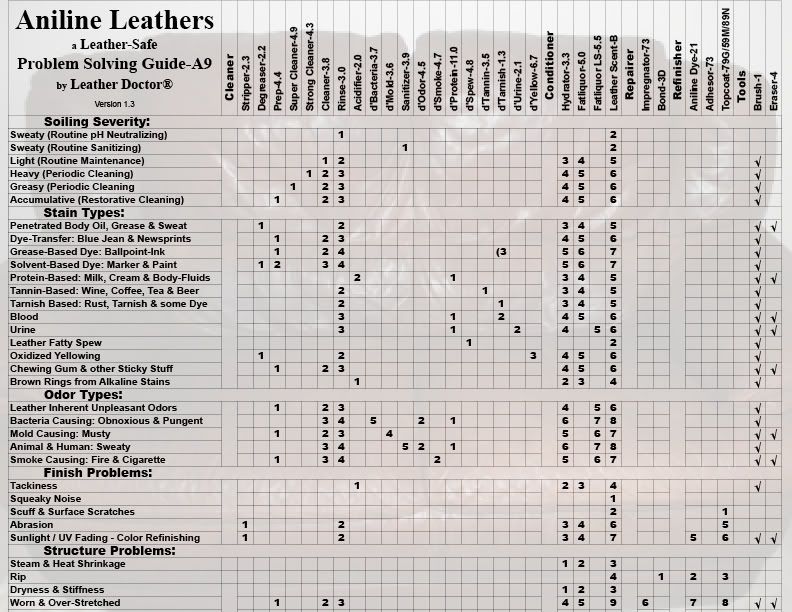
Leather-Safe Aniline Leather Problem Solving Guide-A9
Leather Doctor®
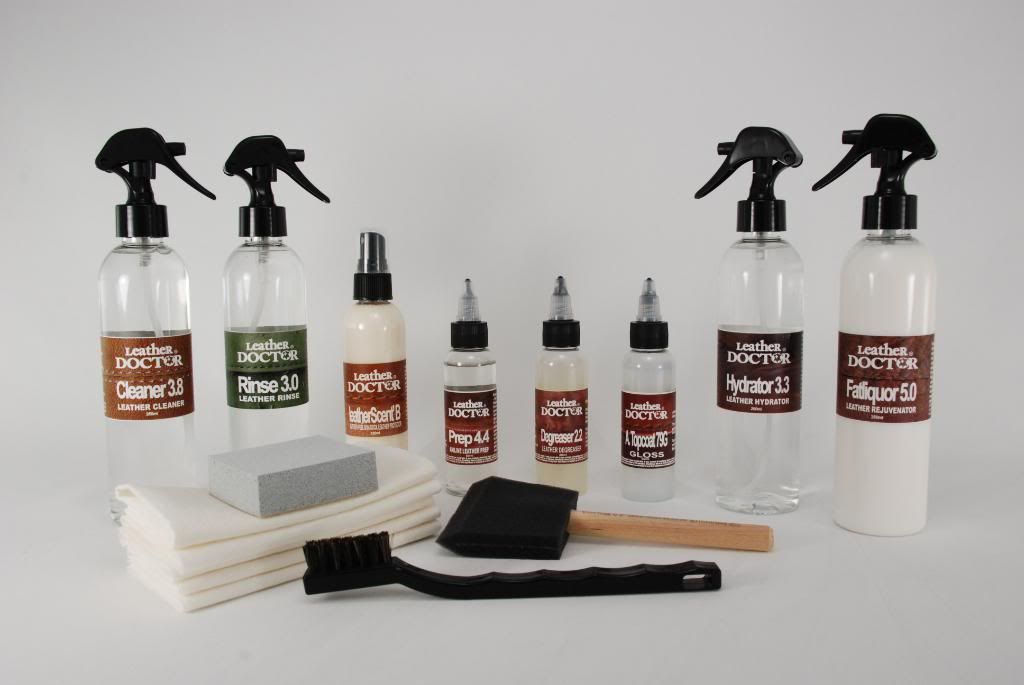
Kit A3.dr : Aniline Leather Degreaser Kit
Aniline leather degreaser Kit A3.dr - features Degreaser-2.2 with a pH value of 2.2 and aniline Topcoat-79G. Degreaser-2.2 is a high viscosity aqueous formulated leather degreaser; for degreasing leather of penetrated sweat, oil and grease stains from skin and hair contact. Topcoat-79G is a gloss topcoat for aniline leathers. It’s an aqueous fine particular size urethane resin emulsion topcoat to protect aniline dyestuff with excellent toughness and flexibility. In most cases the damaged topcoat is camouflaged by the greasy contamination and becomes apparent once the grease is removed. A complete restoration process would involve removing the entire deteriorating topcoat with the help of optional Stripper-2.3, leather Eraser-4; and rejuvenate the leather structure for softness to prevent cracks prior to topcoat refinishing it.
■ Aniline Leather Degreasing System
Degreasing process involves two steps; first is the sufficient penetration of the degreaser to react with the grease and second is to cause a wicking action to bring out the grease. This process may be repeated depending on the depth of grease penetration. An advance technique is to cling wrapped the degreaser to control evaporation for a more effective dwell time.
Instructions
1st Phase Degreasing:
1] Warm up Degreaser-2.2 and shake very well until it turns to an opaque gel.
2] Apply direct and agitate with horsehair Brush-1 and/or Eraser-4 and towel extract until it shows clean.
3] Penetrated stains may require a deeper penetration, a dwell time of 5 to 30 minutes or before it dries for chemical reaction to occur, follows with towel extraction. Severe cases can be saturated and cling wrapped to control evaporation for a longer overnight dwell.
4] Suspended residue is to be rinse with Rinse-3.0 and towel extract until it shows clean.
5] Let natural dry for suspended particulates to wicks up, erase with Eraser-4 and inspect for satisfaction, otherwise repeat as necessary.
2nd Phase Stripping:
When topcoat damages are revealed, it is recommended that the entire panel is stripped to ensure an even appearance for topcoat refinishing. This is best done after the degreasing process.
1] Apply optional Stripper-2.3, scrub with leather Eraser-4 and towel extract to remove the topcoat damaged panel entirely.
2] Optional is use leather Razor-60 for shaving off topcoat, smoothen with 1000 – 1500 grit wet/dry sanding disc in conjunction with Rinse-3.0 with repeat towel extraction.
3] Spray Rinse-3.0 to remove topcoat residues to a squeaky clean.
3rd Phase Hydrating:
1] Spray Hydrator-3.3 with help of foam brush to penetrate the leather for an even appearance.
2] To further activate dormant dyestuff to resurface, the entire seat is wrapped with clear cling wrapper to control evaporation for an overnight dwell for an even appearance. The relaxed leather structure allows the creases and wrinkles to be further worked out for better appearance.
3] Towel extract until towel shows clean prior to immediate fatliquoring.
4th Phase Fatliquoring:
1] Fatliquor-5.0 follows the same procedure as the Hydrator-3.3, with in between drying application as moisture evaporates until it’s saturated.
2] The fully saturated leather is left for slow natural drying for extra softness.
5th Phase Dry Preparation:
1] Inspect for complete removal of existing topcoat, texture roughness is to be smoothen with sanding (1000 – 1500 grit).
2] The leather surface is work over free of residues with Eraser-4 to an even appearance.
6th Phase Topcoat Application:
1] First coating is applied by lint free towel or foam brush with optional 1500 grit fine sanding in between dry coating for smoothness.
2] Airbrushing is optional for a professional result with in between fine sanding to achieve the desired smooth feel.
7th Phase Non-stick Rub Resistant Protection:
1] Spray Leather Scent-B, spread with lint free towel or foam brush and it’s ready to use when dry.


