Results 1 to 49 of 49

Thread: Unknown Stubborn Stain

  1. #1
    Join Date
    Feb 2013
    Posts
    29

    Default Unknown Stubborn Stain

    Hi!

    Just found this very useful forum after spending many, many hours trying to get rid of an unwanted and unknown(origin) stain on my car seat. I bought a used recent model BMW and on the back seat there's a stain that is quite an eye sore. I've tried the regular leather cleaning sprays, soap and water etc and nothing seem to work. The leather is very soft so I don'w want to try anything too aggressive.

    Please take a look at the attached photo and let me know if anyone has seen this type of stain before and how best to get rid of it!

    Thank you in advance!

    Name:  carseatstain.JPG
Views: 1245
Size:  824.2 KB

  2. #2
    Join Date
    Feb 2007
    Location
    Greater Vancouver, Canada.
    Posts
    5,120

    Default

    Is the stain on the seat or on the back cushion?

    It is most likely a dyes stain.

    It could also be a rust stain from partial removed bloodstain, if it is on the seat.

    This is the recommended procedure for unknown stain.

    Dye stain removal > tannin stain removal > tarnish stain removal.

    All dyes will response with Prep-7.7 > Bleach-9.9

    All stains that derived from plants and vegetables will response with d’Tannin-3.5

    All metallic stains like the iron ions from blood will response with d’Tarnish-1.3

    See this problem-solving guide for auto perforated leathers.


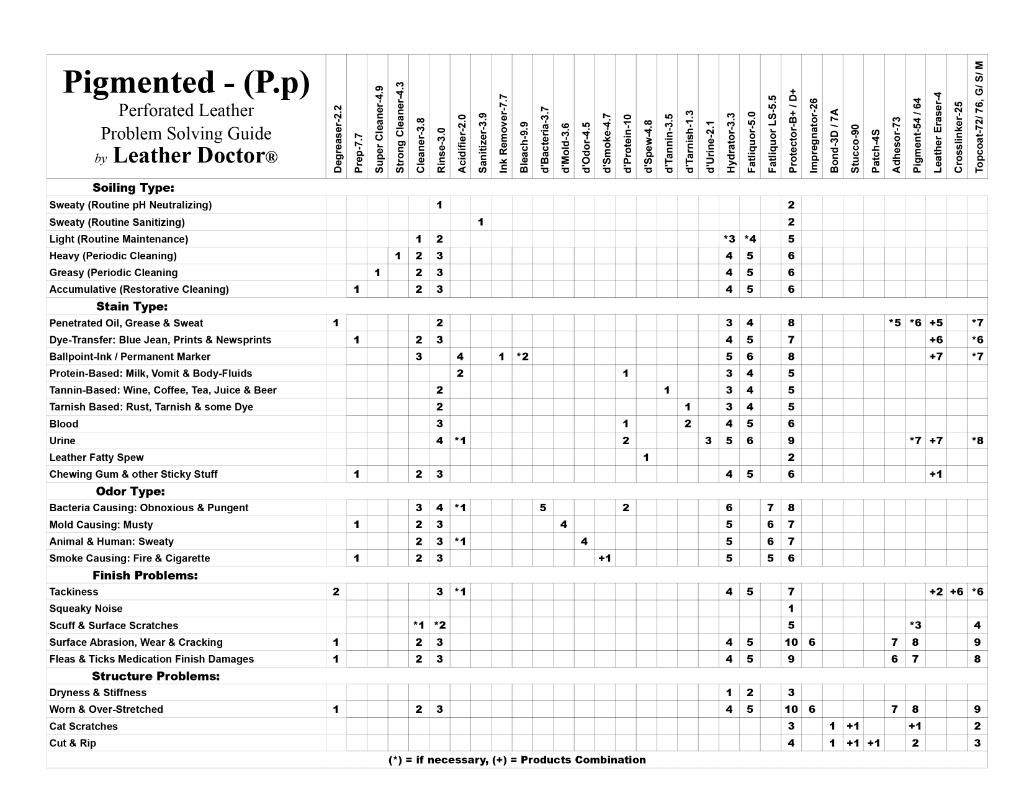
    Leather-Safe Problem Solving Guide (P.p) – Perforated Leathers


    The below is the recommended kit with optional d’Tannin-3.5 and d’Tarnish1.3 as add-on


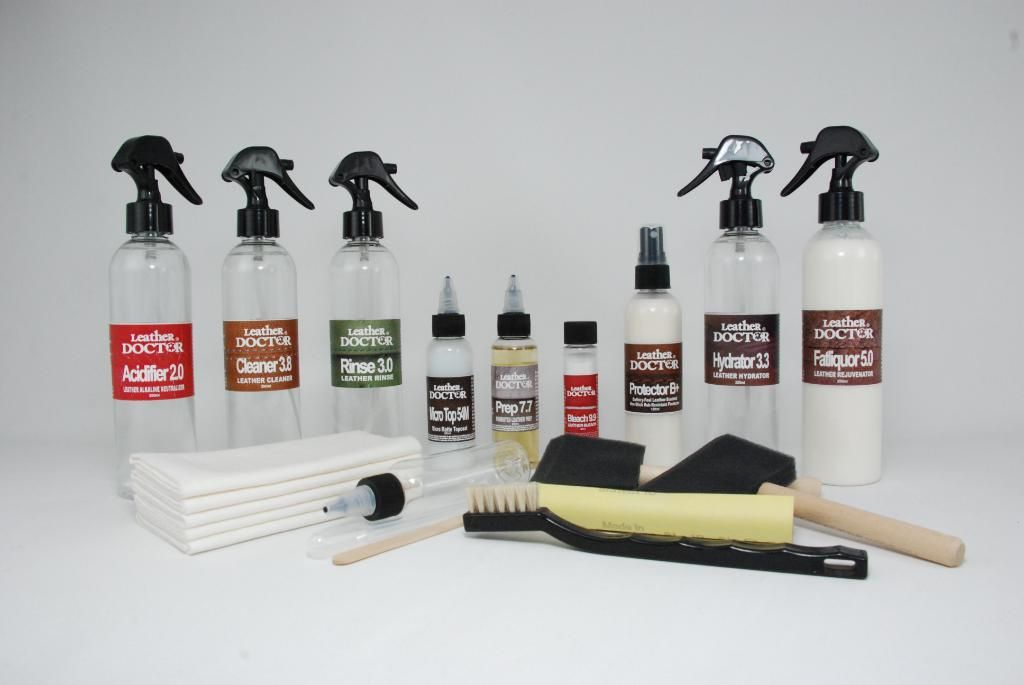
    Kit P7.di (Auto Perforated Leather Dye / Ink Remover Kit)
    Leather Doctor® Kit P7.di is an innovative system developed to remove dye and ink stains from perforated leathers. This novice “reverse-transferring” technique utilizes Prep-7.7 that is squeeze through a paper towel. Prep-7.7 works by penetrating, lubricating and suspending the stains and is continuous wick through the more absorbent paper towel. Residual stains if any is further work by boosting Prep-7.7 with Bleach-9.9. Sticky residue is removed by Cleaner-3.8 follows by Rinse-3.0 and neutralized by Acidifier-2.0. To return the leather to softness, Hydrator-3.3 preconditions it prior to Fatliquor-5.0 replenishing. Micro Top-54M topcoat refinishes is an option and Protector-B+ imparts a non-stick rub-resistant protection with a buttery feel. Note that the product suffix number denotes its pH value in a leather-safe stain removal holistic system.

    Like to give it a try?


    Roger Koh
    [email protected]
    Last edited by Roger Koh; 02-06-2013 at 12:42 PM.

  3. #3
    Join Date
    Feb 2013
    Posts
    29

    Default

    Thank you for your reply Roger.

    Yes the stain is on the bottom of the seat, sorry I forgot to rotate the photo before posting it. I am definitely interested in buying the kit as per your picture and recommendation. One thing though, I live abroad so will you be OK with shipping them overseas? Please let me know the price or PM me.

    Cheers,

    Pook

  4. #4
    Join Date
    Feb 2013
    Posts
    29

    Default

    I received the package today and have email you more pictures of the stain and my car. Now since the solution are in concentrated form what is the mixing ratio? Is mineral water OK to mix with the solution or only distilled water?

    Very eager to get started so please give me as much instructions as possible.

    Pook

  5. #5
    Join Date
    Feb 2007
    Location
    Greater Vancouver, Canada.
    Posts
    5,120

    Default

    Please resend pictures as "attached file".

    To fill it up is the right ratio.

    Distilled or deionized water preferred.

    Difficulties getting them, may get from dehumidifier collection or aircon dripping (no rust contact).

  6. #6
    Join Date
    Feb 2013
    Posts
    29

    Default

    Name:  IMG_4028.JPG
Views: 1152
Size:  87.1 KBName:  IMG_4030.JPG
Views: 904
Size:  87.2 KBName:  IMG_4032.JPG
Views: 889
Size:  73.7 KBName:  IMG_4033.JPG
Views: 910
Size:  73.0 KBName:  IMG_4034.JPG
Views: 954
Size:  128.7 KB

  7. #7
    Join Date
    Feb 2007
    Location
    Greater Vancouver, Canada.
    Posts
    5,120

    Default

    Name:  BMW unknown Stain copy.jpg
Views: 987
Size:  334.7 KB


    Remember that it is an unknown stain and we are trying to work it assuming that it is dye derived.
    If there is sign of color moving within 24 hours, we will know that it should be progressive removed in another 48 hours.
    We have to bear in mind that this unknown stain may have failed attempted by previous owner and we have to take the risk of removing it hoping that the finish is still remains intact. The last resort is a color refinishing if the color is removed together with the stain otherwise this unknown stain may resurface that makes the color refinishing with null effect.

    As we are working on perforated surface, the product may simply seep through the holes and will require a more frequent inspection to keep the paper towel saturated with Prep-7.7. We can tell from the color of the paper towel through the cling wrapper if it is saturated, otherwise apply from the top of the paper.

    When placing the saturated paper towel over the stain, make sure that there is no airspace between for the stain to “reverse transfer”.

    Please take pictures of the progress for reference.

    Roger Koh
    [email protected]

  8. #8
    Join Date
    Feb 2013
    Posts
    29

    Default

    Name:  IMG_4035.jpg
Views: 779
Size:  29.4 KB

    Done

  9. #9
    Join Date
    Feb 2013
    Posts
    29

    Default

    When reapplying the Prep 7.7 to keep the area moist, should I replace the cut paper towel?

  10. #10
    Join Date
    Feb 2007
    Location
    Greater Vancouver, Canada.
    Posts
    5,120

    Default

    Quote Originally Posted by Pook View Post
    When reapplying the Prep 7.7 to keep the area moist, should I replace the cut paper towel?

    Lift up to check for a "reverse transfer" replace if there is.

    Have a bigger size picture to see details, anyway looks good as it is.

  11. #11
    Join Date
    Feb 2013
    Posts
    29

    Default

    After approximately 10 hours some sign of the stain transferring to the paper towel
    Name:  IMG_4037.JPG
Views: 895
Size:  62.5 KB

    Have replaced the paper towel and reapplied the Prep 7.7

  12. #12
    Join Date
    Feb 2007
    Location
    Greater Vancouver, Canada.
    Posts
    5,120

    Default

    If it moves, then it is probably some kinds of dyes stains.

    For the next inspection, please show the stain as well.
    Last edited by Roger Koh; 02-21-2013 at 06:06 PM.

  13. #13
    Join Date
    Feb 2013
    Posts
    29

    Default

    Picture below is after about 24 hours. Note from the last inspection where there were some transfer from the stain to the paper towel, this time no transfer. Have reapplied the pater towel, Prep 7.7 and cling wrap.
    Name:  IMG_4040.JPG
Views: 858
Size:  118.1 KB

  14. #14
    Join Date
    Feb 2007
    Location
    Greater Vancouver, Canada.
    Posts
    5,120

    Default

    Let's continue till the 72 hours for a final inspection.

    Meanwhile watch for any sign of improvement.

    Remember to apply the Prep-7.7 onto the papar towel prior to placing on the stains (avoid pushing the product into the holes - will need to clean them up eventually)

  15. #15
    Join Date
    Feb 2013
    Posts
    29

    Default

    After 70 hours - WOW! The stain is gone and the dark patch is where I put too much Prep 7.7 directly on the leather. There's a ring of yellowish stain left over from where the original stain was.

    OK what's next Roger?
    Name:  IMG_4041.JPG
Views: 930
Size:  133.2 KB

  16. #16
    Join Date
    Feb 2007
    Location
    Greater Vancouver, Canada.
    Posts
    5,120

    Default

    We get rid of the fugitive stains first before we clean up the excess Prep-7.7 with Cleaner-3.8 follows with Rinse-3.0.

    1. I believe the paper was not big enough to catch the stain.

    2. Apply Prep-7.7 to a paper towel bigger than the stain and place over it (to avoid pushing Prep-7.7 into the holes that will need clean up).

    3. Do as before and I believe these fugitive stains already suspended is much easier "reverse transfer' to the paper towel.

    Note: Let's have a look at the paper application this time.

    By the way: how big was the previous paper application?

    Roger Koh
    [email protected]

  17. #17
    Join Date
    Feb 2013
    Posts
    29

    Default

    I've enlarged the pater towel size and have begun the process again. The previous paper application was enough the cover the main stain only. I'll report back in another 60+ hours or if the stain is gone before that.
    Name:  IMG_4045.JPG
Views: 879
Size:  81.6 KB

  18. #18
    Join Date
    Feb 2007
    Location
    Greater Vancouver, Canada.
    Posts
    5,120

    Default

    There is a possibilities that the stains are from beneath other than from the surface.

    Should have a look at the paper towel, that might give us a clue.

  19. #19
    Join Date
    Feb 2013
    Posts
    29

    Default

    OK I will take a picture of the new paper towel after 24 hours for you - I've thrown the old one away!

  20. #20
    Join Date
    Feb 2013
    Posts
    29

    Default

    After 24 hours some reverse transfer to the paper towel:
    Name:  IMG_4053.JPG
Views: 877
Size:  73.0 KB

    The seat after 24 hours of the 2nd round:
    Name:  IMG_4048.JPG
Views: 865
Size:  91.9 KB

    Continue for the full 72 hours or should I start doing something else Roger?

  21. #21
    Join Date
    Feb 2007
    Location
    Greater Vancouver, Canada.
    Posts
    5,120

    Default

    Try cleaning up the excess Prep-7.7 and to the entire seat.

    Apply Cleaner-3.8, agitates with horsehair Brush-1, and extract (blotting without scrubbing).

    Then follows with Rinse-3.0 terry towel extract it until you have a squeaky feel.

    Lay paper towel over the entire section and spray Hydrator-3.3 to help wick up the stains.

    First cover with plastic cling wrapper then let it dwell for 8 hours before removing the plastic sheet for evaporation to take place.

    Like to see some pictures that you are doing it correctly.

    I believe the surface stains is now gone.

    What come out could possibly be stains that have originally gone though the holes that have now resurface.

    If the original surface stain is gone, the remaining will eventually be gone as well.

    Roger.
    Last edited by Roger Koh; 02-25-2013 at 09:28 PM.

  22. #22
    Join Date
    Feb 2013
    Posts
    29

    Default

    Roger are there any pictures from someone else's post that I can see for reference?

    The last step I'm not sure of what you mean. Are you saying for me to cover the area with paper towel and then spray Hydrator 3.3 and cover it up with cling wrap for 8 hours?

  23. #23
    Join Date
    Feb 2007
    Location
    Greater Vancouver, Canada.
    Posts
    5,120

    Default

    Show pictures if the darkening spot is gone after Cleaner-3.8 follows with Rinse-3.0


    Then, repeat what you have done, instead of using Prep-7.7 now you use Hydrator-3.3.

    Spray Hydrator-3.3 into the holes of the stain area and cover it up with paper towel without airspace.

    The dwelling time allows the stains from the holes to have a chance to migrate or wick up to the towel.

    After 8 hours just remove the cling wrapper and leave the paper towel on the surface to dry out completely.

    To secure the paper towel in place, you can have a terry towel to hold it down from displacement (out of position).

    The reason for doing this is to remove the stains from below the surface; I believe there is from previous failed attempt.


    Show pictures and I will tell you if you are doing it right.


    Roger
    Last edited by Roger Koh; 02-26-2013 at 11:31 AM.

  24. #24
    Join Date
    Feb 2013
    Posts
    29

    Default

    OK here's what I did:

    1 & 2 Cleaning with Cleaner 3.8 and "agitating" with brush:
    Name:  IMG_4056.JPG
Views: 849
Size:  79.5 KBName:  IMG_4057.JPG
Views: 839
Size:  97.6 KB

    Then I used Rinse 3.0 and towel extract till "squeaky". Next I sprayed Hydrator 3.3 into the holes and covered with paper towels, spraying more Hydrator into the towel. Added another layer of paper towel + cling wrap and terry towel to hold it down:
    Name:  IMG_4063.JPG
Views: 833
Size:  51.8 KB

    Will remove all and let dry further after 8 hours. If the stain or dark spot is still there after should I repeat the process?

  25. #25
    Join Date
    Feb 2013
    Posts
    29

    Default

    Forgot to show you the picture after using the Cleaner and Rinse:
    Name:  IMG_4062.JPG
Views: 780
Size:  79.1 KB

  26. #26
    Join Date
    Feb 2007
    Location
    Greater Vancouver, Canada.
    Posts
    5,120

    Default

    Questions to the picture you show above. . .

    1. Is the darkening stain still damp/wet to the touch or completely dry?

    If it is still wet, you can blow-dry it with hair dryer until the darkening marks disappear.

    If it the darkening remain the same even with hair blower, the Prep-7.7 is still there and need further removal with Cleaner-3.8 > Rinse-3.0 as you have done before.

    Please take a close look if the finishes are still there or could have been removed to cause the darkening effect as well.

    Could you take a close-up (high resolution) picture of the darkening area?

    You could use a magnifying glass to take a close look as well to check if the finish is intact as well.

    Roger

  27. #27
    Join Date
    Feb 2013
    Posts
    29

    Default

    OK I went back and reclean the seat but this time I was a bit too aggressive with the brush and scratch the leather a bit. I've also thoroughly dried it with a hair dryer and the stain is still there. Now I have applied the Hydrator and covered it up as before. Some close up pictures of the dark area - can't see the stain too well but can clearly see the "scratch" I did with the brush!
    Name:  IMG_4066.JPG
Views: 959
Size:  888.2 KB

  28. #28
    Join Date
    Feb 2007
    Location
    Greater Vancouver, Canada.
    Posts
    5,120

    Default

    I've also thoroughly dried it with a hair dryer and the stain is still there. (What is this stain that is still there?)

    Some close up pictures of the dark area - can't see the stain too well (What is this stain?) but can clearly see the "scratch" I did with the brush!

  29. #29
    Join Date
    Feb 2013
    Posts
    29

    Default

    Roger what I meant by stain is the black/darkening stain.

    What is your next suggestion please?

  30. #30
    Join Date
    Feb 2013
    Posts
    29

    Default

    Picture after 8 hours of the paper towel that I left covering the after applying the Hydrator:
    Name:  IMG_4069.JPG
Views: 906
Size:  80.2 KB

  31. #31
    Join Date
    Feb 2013
    Posts
    29

    Default

    Picture of the seat after 8 hours of the cleaning process:
    Name:  IMG_4070.JPG
Views: 938
Size:  125.4 KB

    I've put a new paper tower to cover the area and letting it dry per your instruction. Please let me know the next step.

  32. #32
    Join Date
    Feb 2007
    Location
    Greater Vancouver, Canada.
    Posts
    5,120

    Default

    What have accomplished so far is

    1] Removing the brownish stain,

    2] Removing the darkening effect,


    We now want to get rid of the surrounding yellowish stain first; thereafter the holes edges and the brush marks need repairs with color prior to topcoat the entire section for an even appearance.

    3] To remove the surrounding yellowish “unknown” stain, we are trying d’Tannin-3.5 (a reducing cleaning agent).

    3a.] Shake well and mist spray over the yellowing areas with white paper towel to extract (please see if any yellow stain is pick up by towel, if do repeat until it shows clean).

    3b.] Spray again on the stain, feather out to the entire section, and leave wet to naturally dry for the product to react with the stain as it dries.


    Roger Koh
    [email protected]

  33. #33
    Join Date
    Feb 2013
    Posts
    29

    Default

    Just got the package for the rest of your cleaning products however it seems that the stain has "spread". Initially before our cleaning attempt the stain was concentrated in the middle of the seat. Now the stain seems to have been push out into a bigger circle - see picture. I have done everything apart from using the the d'Tannin as per your last instruction but I want you take a look at the stain as of today first. Please advise what I should do next as I didn't expect the stain to resurface and comeback with a vengeance!

    Name:  IMG_4073.JPG
Views: 808
Size:  95.0 KB

  34. #34
    Join Date
    Feb 2013
    Posts
    29

    Default

    I am panicking a little here so if you need to see a high res picture let me know.

  35. #35
    Join Date
    Feb 2007
    Location
    Greater Vancouver, Canada.
    Posts
    5,120

    Default

    Do the tests at position mark out on picture below. . .
    1.] Shake both the d'Tannin-3.5 and d'Tarnish-1.3 until fully dissolved.
    2.] Use a cotton swab and apply to the mark areas accordingly and check cotton swab of color as well (show picture if color transfer).
    3.] Apply both products over a cutout paper towel and leave until naturally dry for inspection.

    B.1] Mix Bleach-9.9 with Prep-7.7 and thereafter add hot water and stir to a whitish creamy paste.
    B.2] The ratio by weight is Bleach-9.9 [1] + Prep-7.7 [2] + Hot Water [2].
    B.3] Example of the mix by weight in the bottle may start with Bleach-9.9 [10gm] + Prep-7.7 [20gm]; stir well then add Hot Water [20gm] using the pipette, stir again and leave for 10 minutes or so for it to gel to a whitish creamy paste prior to application.

    Note:
    Reduce the mix to half teaspoon of Bleach-9.9 to 1 teaspoon of Prep-7.7 into the spare bottle and use the pipette to drip hot water until a creamy paste.
    Use only non-metal tools.

    Application by indirect contact (makes easy clean up from getting into the perforated holes)
    Apply mix onto a cutout paper towel, place on top of the marked area, and leave it until crispy dry.

    Using paper towel helps to trap wick up residue instead of remaining on the leather surface.


    Attachment 1156

  36. #36
    Join Date
    Feb 2013
    Posts
    29

    Default

    Your attachment picture is not showing on the page so I've done the test on the general area of the stain.

    I've used a cotton ball sprayed with d'Tannin-3.5 and applied to the stain and swab the area with it. There were some slight transfer, see picture, and now I've started step #3 above.
    Name:  IMG_4074.JPG
Views: 848
Size:  60.9 KB
    Last edited by Pook; 03-12-2013 at 08:20 PM.

  37. #37
    Join Date
    Feb 2007
    Location
    Greater Vancouver, Canada.
    Posts
    5,120

    Default

    Re attach picture.

    You may want to hold on the Bleach-9.9 until we see results from d'Tannin-3.5 and d'Tarnish-1.3.


    Name:  IMG_4073 copy.jpg
Views: 785
Size:  181.8 KB
    Last edited by Roger Koh; 03-13-2013 at 10:53 AM.

  38. #38
    Join Date
    Feb 2013
    Posts
    29

    Default

    I was able to lift a bit of the stain off using the cotton ball, picture in previous post, sprayed with d'Tannin-3.5 applying moderate rubbing force. After that I had applied the paper towel and sprayed the towel with both d'Tannin-3.5 and d'Tarnish-1.3 and left to dry. After 24 hours there was no transfer to the paper towel and the stain looks the same, see pictures below. Please advise what to do next? Apply the Bleach-9.9 to the whole area?
    Name:  IMG_4075.JPG
Views: 828
Size:  71.8 KB
    Name:  IMG_4077.JPG
Views: 678
Size:  73.2 KB
    Name:  IMG_4076.JPG
Views: 842
Size:  96.5 KB

  39. #39
    Join Date
    Feb 2007
    Location
    Greater Vancouver, Canada.
    Posts
    5,120

    Default

    We will try Prep-7.7 for a continuous 72 hours dwell over the entire area as post #17

  40. #40
    Join Date
    Feb 2013
    Posts
    29

    Default

    OK Roger and will report back in 3 days.

  41. #41
    Join Date
    Feb 2013
    Posts
    29

    Default

    Hi Roger - after over 72 hours there were some transfer to the tissue paper but the stain is still there. I've attached 2 pictures, 1 of the seat and the other of the tissue. Please advise what the next step is.
    Name:  IMG_4078.JPG
Views: 757
Size:  98.6 KBName:  IMG_4079.JPG
Views: 795
Size:  68.1 KB

  42. #42
    Join Date
    Feb 2007
    Location
    Greater Vancouver, Canada.
    Posts
    5,120

    Default

    It is improving please repeat treatment.

  43. #43
    Join Date
    Feb 2013
    Posts
    29

    Default

    OK will do.

  44. #44
    Join Date
    Feb 2013
    Posts
    29

    Default

    Roger - after another bout of Prep 7.7:
    Name:  IMG_4080.JPG
Views: 749
Size:  103.1 KB
    Name:  IMG_4081.JPG
Views: 763
Size:  57.6 KB

    Please advise what to do next?

  45. #45
    Join Date
    Feb 2007
    Location
    Greater Vancouver, Canada.
    Posts
    5,120

    Default

    Please do a test with Bleach-9.9 as booster to the Prep-7.7 (mixing instruction from post #35 into the spare bottle)

    Apply to position of testing as mark in post #37.

    Avoid pushing the mix into the perforated holes.

    Perhaps use a painting brush to apply.

    Inspect in 8 hours duration or when completely dry.

    Roger

  46. #46
    Join Date
    Feb 2013
    Posts
    29

    Default

    I've mixed the bleach as per your instruction and notice something unexpected. After adding everything and while stirring the mixture bubble up and overflow the bottle a bit. Hope this is normal! I've applied the mixture to a test area using a cotton ball and will report back.

  47. #47
    Join Date
    Feb 2013
    Posts
    29

    Default

    OK 1st picture is when I was applying the mixture with cotton wool:
    Name:  IMG_4082.JPG
Views: 789
Size:  99.5 KB
    Next picture is after well over 24 hours:
    Name:  IMG_4084.JPG
Views: 743
Size:  101.7 KB

    Should I be more aggressive with the bleach mixture?

  48. #48
    Join Date
    Feb 2007
    Location
    Greater Vancouver, Canada.
    Posts
    5,120

    Default

    Pook,

    Mark the spot with a paper sticker exactly where the spot is.

    Have a close-up view to see if the color lighten.

    The mix is at ratio 1: 2 : 2 (Bleach-9.9 : Prep-7.7 : Hot Water)

    Please apply with direct contact on the stain for testing.

    It should work!

    This picture was done on a Rolls Royce leather seat, with perfect removal.
    Name:  RollsRoyceLeatherBleaching-26.jpg
Views: 777
Size:  35.6 KB


    Final Result!
    Name:  AfterBleaching-28.jpg
Views: 716
Size:  35.2 KB


    Before with print from plastic bag
    Name:  RRPrintStainRemoval-026.jpg
Views: 628
Size:  34.2 KB


    In your case, bleaching is more messy as the solid may get into the perforated holes.

    I will show another pictue how to avoid the bleach from getting into the holes.

    Roger
    Last edited by Roger Koh; 03-26-2013 at 03:16 PM.

  49. #49
    Join Date
    Feb 2007
    Location
    Greater Vancouver, Canada.
    Posts
    5,120

    Default

    This is how the perforated holes is plugged off when applying the Bleach mixture with a small painting brush.

    Please do this on the test area mark in red.

    Name:  005.JPG
Views: 939
Size:  3.13 MB
    Last edited by Roger Koh; 03-26-2013 at 03:34 PM.

Thread Information

Users Browsing this Thread

There are currently 1 users browsing this thread. (0 members and 1 guests)

Tags for this Thread

Posting Permissions

  • You may not post new threads
  • You may not post replies
  • You may not post attachments
  • You may not edit your posts
  •