Results 1 to 27 of 27

Thread: Tire Mark on my Leather Seat...

  1. #1
    Join Date
    Feb 2012
    Posts
    564

    Default Tire Mark on my Leather Seat...

    Hello I would like to remove tire mark on my leather seats and I have seen on the forum a guy who did it with your product (on a Rolls Royce phantom)

    Would it be possible to get the same product that he use on his Auto ?

    Best regards,

    benjamin ANé

    #1


    #2


    #3


    #4


    #5

  2. #2
    Join Date
    Feb 2007
    Location
    Greater Vancouver, Canada.
    Posts
    5,120

    Default

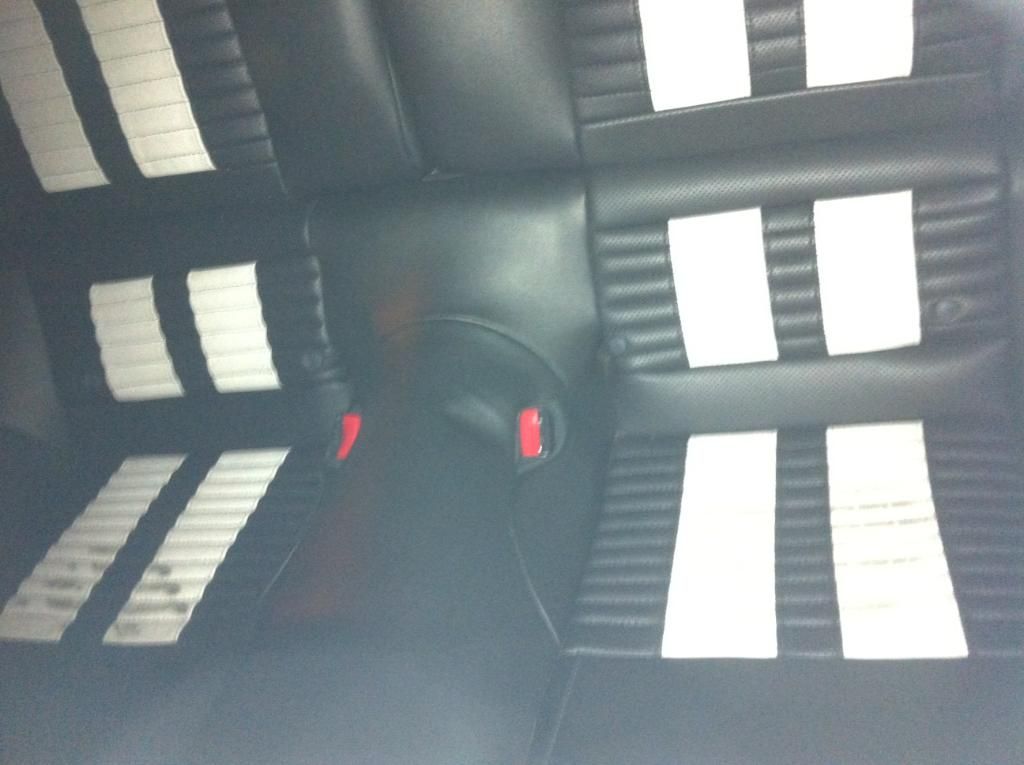
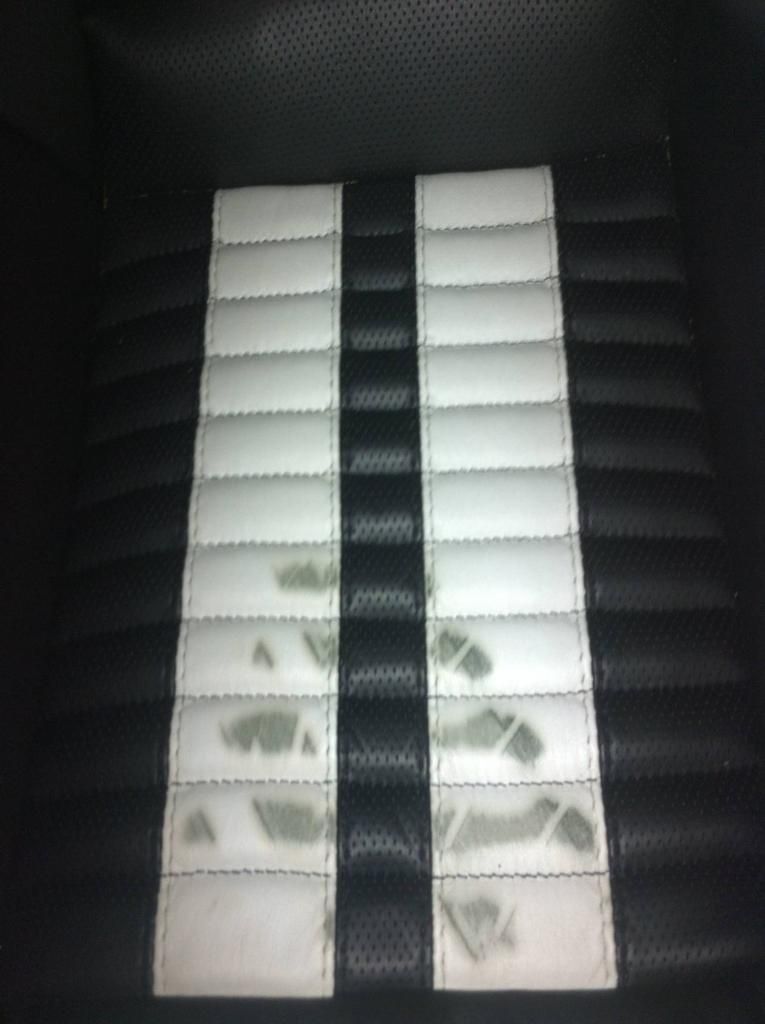
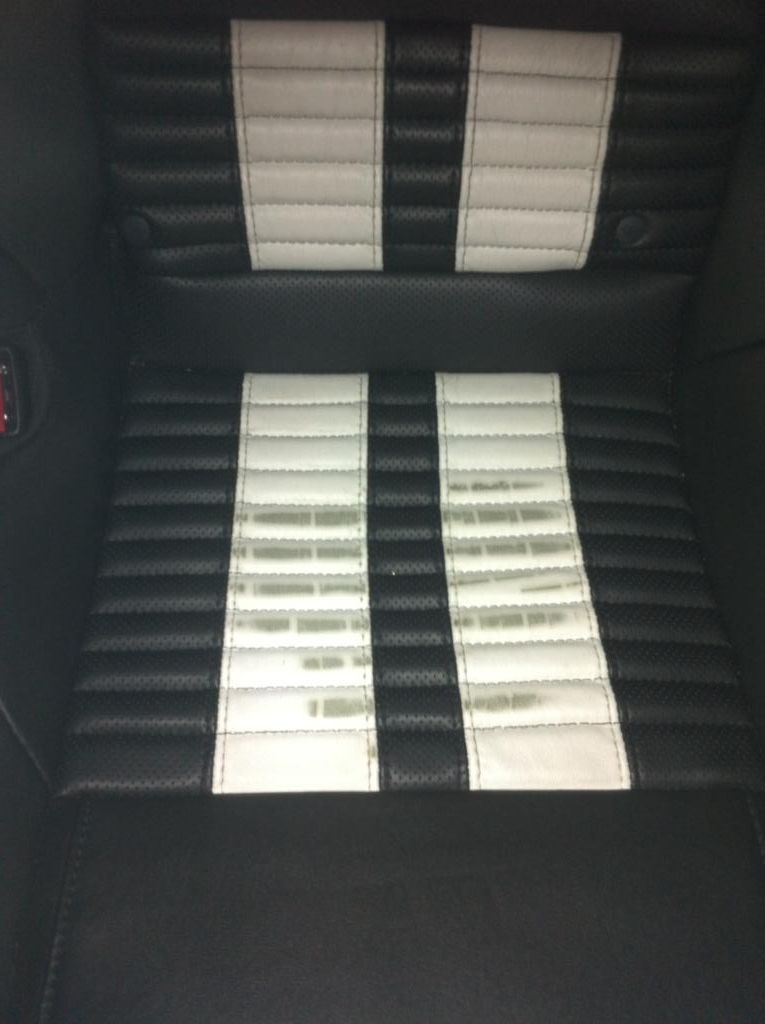
    Tire marks stain is carbon black pigment, unlike dyes may not be removed 100%. The max so far is a 80-90% by Laszlo
    On his 2005 Audi with cream beige leather interior.

    Bleach-9.9 was not used, but could be recommended as booster after the first phase by using Prep-7.7. in this white leather. The worst scenario is to have a light color touch-up thereafter.

    Kit Ap5.di is the recommended kit.


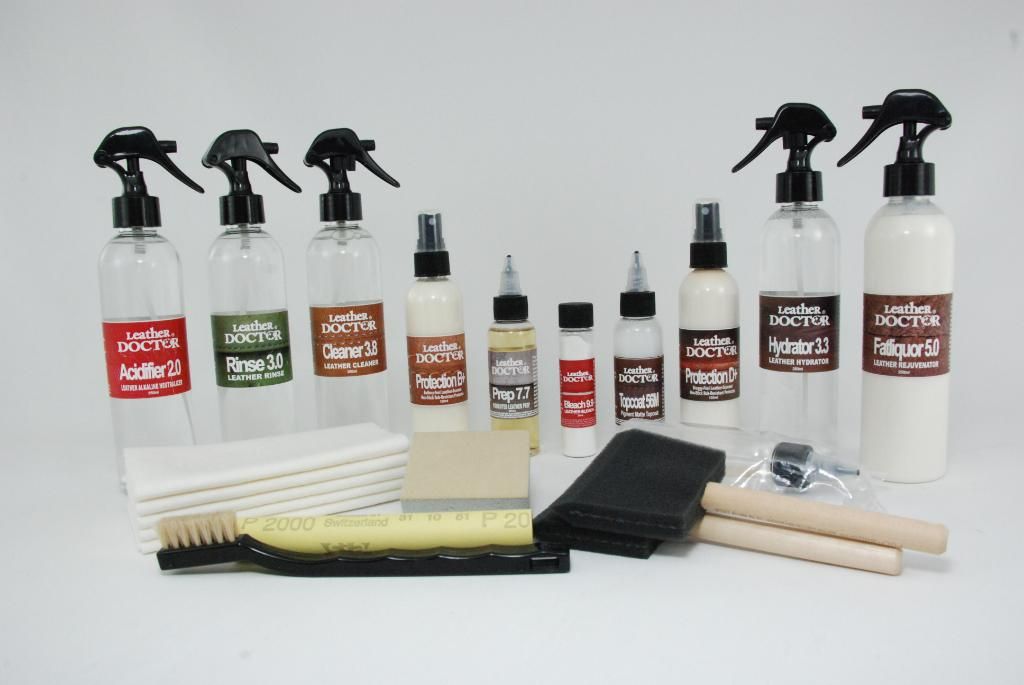
    Leather Doctor® Auto Pigmented Leather Care + Ink/Dye + Bleach + Topcoat = Kit Ap5.di


    Roger Koh
    [email protected]

  3. #3
    Join Date
    Apr 2013
    Posts
    12

    Default

    hello,

    I finally receive my kit and would like to use it as soon as possible, but I think I'm gonna need your help

    read you soon.

  4. #4
    Join Date
    Feb 2007
    Location
    Greater Vancouver, Canada.
    Posts
    5,120

    Default

    Simply apply the Prep-7.7 onto the stain and squeeze through with cut-out paper towel from the kit.

    You may use a cling wrapper over it to hold the paper in place and let it dwell up to 72 hours.

    If stain is reverse absorb by the paper towel, you may replace with fresh application.

    This is the first phase and we would like to see how much the stain is release.

    Please show pictures if you are doing accordingly.

    Roger Koh
    [email protected]

  5. #5
    Join Date
    Apr 2013
    Posts
    12

    Default

    here is what I have done today...
    let me know if I'm wrong somewhere...
    Name:  IMG_0612.jpg
Views: 1395
Size:  1.91 MBName:  IMG_0613.JPG
Views: 1439
Size:  1.78 MBName:  IMG_0614.JPG
Views: 1359
Size:  1.68 MBName:  IMG_0615.JPG
Views: 1385
Size:  1.66 MB

  6. #6
    Join Date
    Feb 2007
    Location
    Greater Vancouver, Canada.
    Posts
    5,120

    Default

    When attaching pictures, give a number (e.g. #1 and so on), describe the picture and leave spaces to separate them for easier reference.

    Picture #3 – shows the paper towel placing over the stain.

    Tips:
    Allow the Prep-7.7 to squeeze through, otherwise top it up onto the paper towel.
    Leave it as it is, with option of cling wrapper to see through and hold the paper towel in place.
    This will be left for a continuous dwell of 72 hours for an inspection.
    The stain areas have to be kept moist with regular top-up.
    If the paper shows stain transfer, you may replace a new piece.

    Idea:
    The stains have to be kept moist so that the suspended stains have a chance to wick through the paper towel “reverse transfer”.
    Do not allow the Prep-7.7 to go dry, otherwise the suspended stain will not able to move and being trapped by the paper towel.

    Remove the weight and the towel.

    Please show pictures accordingly.


    Roger Koh
    [email protected]

  7. #7
    Join Date
    Apr 2013
    Posts
    12

    Default

    #1 the result of 1 night of prep-7.7 + paper towel :
    Name:  IMG_0616.JPG
Views: 1488
Size:  1.69 MB


    #2 just the paper towel not on the seat :
    Name:  IMG_0620.jpg
Views: 1441
Size:  1.75 MB


    #3 the result (just the seat) after one night of treatment :
    Name:  IMG_0618.jpg
Views: 1524
Size:  2.06 MB


    #4 the other seat (not treated) to see the difference betwenn treated and untreated seat :
    Name:  IMG_0617.jpg
Views: 1452
Size:  1.93 MB


    #5 the new setup for today :
    Name:  IMG_0619.jpg
Views: 1422
Size:  1.90 MB


    I have to say that I already use 1/3 of the bottle of prep 7.7 and I need to do 2 seats...
    So what should I do ? keep half of the bottle for the other seat or go ahead and use as much as 7.7 that I need to keep the paper towel wet ?

  8. #8
    Join Date
    Feb 2007
    Location
    Greater Vancouver, Canada.
    Posts
    5,120

    Default

    This new setup #5 is better in the sense that you can see what is going on, showing is the stain kept moist and stains suspended being reverse absorbed by the paper towel.

    My recommendation is only for half a seat, or even only on one spot to see the final result to the end. This idea will enable you to assess how much you will need to finish off the rest.

    Remind you that tire mark is mainly carbon and it is tougher to remove than dye stains like the common blue jean dyes or ballpoint ink. We have proven success even on permanent marker “sharpie” but yet to see how far the Prep-7.7 can moves the tire mark. Records shows that if the stain is dislodged as shown on “#2 just the paper towel not on the seat” it will eventually be gone. We are still on the first phase of the removal and decision for the next move is after 72hours, to resume and repeat for another 72hours or to incorporate bleaching action with Bleach-9.9.

    Need to see pictures of every inspection interval, both the paper and the leather stain.


    Roger Koh
    [email protected]
    Last edited by Roger Koh; 04-11-2013 at 08:02 AM.

  9. #9
    Join Date
    Apr 2013
    Posts
    12

    Default

    next inspection (after about 48h) :
    #1 the paper towel :
    Name:  IMG_0622.jpg
Views: 1421
Size:  1.50 MB


    #2 the seat after 48h of prep 7.7 :
    Name:  IMG_0621.jpg
Views: 1438
Size:  1.98 MB


    the problem with the picture #2 is that we can see a little bit of white on black (in the second row) like if, when I passed the paper towel to wipe the product, I detached a little bit of leather or white color from the seat and we can see it on the second row...
    It's not a lot so it's difficult to see it on the picture... but I'm sure of it
    I can also feel that the leather is really sticky when I touch it so I don't know if it's a good a bad news...

    I setup a new paper towel with prep 7.7 like I did on #5.

    Let me know what to do about the white "things", maybe my error was to wipe....

  10. #10
    Join Date
    Feb 2007
    Location
    Greater Vancouver, Canada.
    Posts
    5,120

    Default

    Good news is that the Prep-7.7 is working on the stain and reverse transfer onto the paper towel.

    The bad news is the unusual weakening of the finish even at 48 hours.

    Most likely, the topcoat is no more there that is the main reason.

    Let us know some maintenance history, what has been used and how the seat was previously cleaned.

    Worst scenario is to have color refinishing after the stain is removed (with some color as well).

    It is not possible to cover up the stain just by simply re-coloring over it, this stain types will wick through the new finishes and has to be totally eliminated.

    Picture #2, the third white panel from top shows the difference of color tone between the grain and the groves. If the groves are the original color, then the topcoat is possibly missing. A test clean can be done on these areas with Prep-7.7 letting it dwell half hour and horsehair brush it with Cleaner-3.8 follows with Rinse-3.0. If the finish is sticky, saturate paper towel with Acidifier-2.0 until natural dry to check for stickiness. To eliminate sticky problem a 10% Crosslinker is added to the topcoat in the refinishing.

    Roger Koh
    [email protected]

  11. #11
    Join Date
    Apr 2013
    Posts
    12

    Default

    I never cleaned the seat so I can't tell you anythings about the cleaning history cause I just got the car...

    here is the result after 72h of prep 7.7 :
    Name:  IMG_0629.jpg
Views: 1339
Size:  1.86 MB

    I don't know what to do now...
    Should I continue to use prep7.7 for 72h more ?

  12. #12
    Join Date
    Feb 2007
    Location
    Greater Vancouver, Canada.
    Posts
    5,120

    Default

    Continue as long as we get stain transfer onto the paper towel.

  13. #13
    Join Date
    Apr 2013
    Posts
    12

    Default

    hello, I'm just thinking something that might be important : In your first recommendation, you told me not to let the prep7,7 dry and I don't do it... cause I put the prep generally at 18h and let it dry until the next day... I actually can't go at the car every 5 hour and put more prep on the paper towel ... should I do everything I can not to let the prep dry or it's not really important and I can continue to do the same ?

    sorry for missreading your first post
    sorry for my english

    read you soon.

    ben

  14. #14
    Join Date
    Feb 2007
    Location
    Greater Vancouver, Canada.
    Posts
    5,120

    Default

    Continue to do the same.

    Tips:
    If the stain is dry, suspended stain may not be transfer onto the paper towel.
    Apply Prep-7.7 directly onto the stain and wait 30 minutes or so to move the stain and blot it with paper towel.
    Leaving the paper towel moist is more convenient for the stain to be absorbed by the paper towel instantly.

  15. #15
    Join Date
    Apr 2013
    Posts
    12

    Default

    here is the last result : it seems that there is less stain on the paper towel now.... should we stop ?
    Name:  IMG_0632.jpg
Views: 1402
Size:  2.01 MB

  16. #16
    Join Date
    Feb 2007
    Location
    Greater Vancouver, Canada.
    Posts
    5,120

    Default

    Clean up the remaining suspended stain with Cleaner-3.8 follows with Rinse-3.0 to prepare for the next phase of using Bleach-9.9 as a booster for the Prep-7.7. Then prepare the following mixture, I suggest you use one third of the bleach each time with the recommended mixing ratio by weight. However, you can add slowly accordingly and keep the mix creamy at each stage and you will get it right. Show pictures of your mix, tools are in the kit.


    Mixing Instruction:
    Mixing ratio Bleach-9.9 (1 part) Prep-7.7 (2 part) and Hot water (2part).
    Use non-metal tools for the mixing.
    Add Prep-7.7 to the Bleach-9.9 in a stirring mixed, wait a minute, and then drip hot water with a plastic pipette to a creamy paste.

    Application Instruction:
    1. Apply creamy paste onto the stain.
    2. Let dwell 8 hours or until dry for inspection.
    3. Repeat with fresh application as necessary.
    4. Remove remaining sticky residue with Cleaner-3.8.
    5. Rinse and pH balance with Acidifier-2.0 to a squeaky clean.

  17. #17
    Join Date
    Apr 2013
    Posts
    12

    Default

    1st mix I obtained :

    Name:  IMG_0640.JPG
Views: 1375
Size:  1.90 MB

    the probleme was that I probably put too much prep7.7 and I didnot reach the creamy paste, it was too liquid...
    I kept this mix in a glass just in case you think I can reuse it by adding bleach in it or doing something else, let me know


    2nd mix I obtained by doing what they said on instruction on the bleach 9.9 (first water until I obtained creamy paste then prep 7.7 (ratio 1 to 1)) :

    Name:  IMG_0641.jpg
Views: 1381
Size:  1.53 MB

    I choose to try this instruction cause by starting with bleach9.9 + prep7.7 then add water, my mix was too liquid each time I tried...
    The mix seems correct but is not so creamy cause there is a lot of little granulate. It seems that they cannot be solved, I don't know why and I hope it's normal...


    here is the mix on s-the seat :

    Name:  IMG_0642.jpg
Views: 1242
Size:  1.97 MB

  18. #18
    Join Date
    Feb 2007
    Location
    Greater Vancouver, Canada.
    Posts
    5,120

    Default

    >>>1st mix I obtained :
    The problem was that I probably put too much prep7.7 and I did not reach the creamy paste, it was too liquid...
    I kept this mix in a glass just in case you think I can reuse it by adding bleach in it or doing something else, let me know.

    Tips:
    Drip “hot” water by using the plastic pipette provided, it will be more creamy – show pictures.
    Keep in the plastic bottle with cap on, if left exposed it will gradually lose its bleaching power.


    >>>2nd mix I obtained by doing what they said on instruction on the bleach 9.9 (first water until I obtained creamy paste then prep 7.7 (ratio 1 to 1)) :
    I choose to try this instruction cause by starting with bleach9.9 + prep7.7 then add water, my mix was too liquid each time I tried...
    The mix seems correct but is not so creamy cause there is a lot of little granulate. It seems that they cannot be solved, I don't know why and I hope it's normal...

    Tips:
    Both the Bleach-9.9 and the Prep-7.7 has to be activated with “HOT” water drip to produce a creamy paste try it – and show what you get!


    >>>here is the mix on s-the seat :

    Tips:
    I believe this is a test out.
    Note that the section that the two test spot is on, the white has a two tone effect, which I think is not original.
    It is either the top grain topcoat has been removed prior, or accumulated soiling with previous aged conditioner that has accumulated.
    Try putting the Bleach-9.9 mix onto the center between the stains to see if the groves darker shade be removed.
    You may need to use the horsehair brush to do this job.
    That is why I only recommend horsehair brushes to work on leathers to reach into the groves as well.


    Roger Koh
    [email protected]

  19. #19
    Join Date
    Feb 2007
    Location
    Greater Vancouver, Canada.
    Posts
    5,120

    Default

    Tips:

    The red circle marks indicate finishes damages, caused by abrasion.

    Color refinishing system recommended:
    Adhesor-73
    Pigment-64
    PigTop-64M
    Protector-B+


    Finishes Damages caused by Abrasion:
    Name:  finishesDamages copy.jpg
Views: 1312
Size:  2.98 MB

  20. #20
    Join Date
    Apr 2013
    Posts
    12

    Default

    hello,

    you are telling me that I m gonna need more product to reach the best result right ?

    And I m sure I m gonna need more prep7.7 for the treatment of the second part of the seat.
    So you should send it to me this as soon as possible cause the first kit took a very long time to arrive.

    I finally removed the seat from the car and put it into my apartment and now I can see the evolution of every product on leather at every minute....

    because the bleach9.9 is not giving me satisfaction, I try to put the prep7.7 directly on the seat with no paper towel, wait 2 hours and brushe it with the horsehair brushes and it seems to give me good results.

    what do you think about this approach ?

  21. #21
    Join Date
    Feb 2007
    Location
    Greater Vancouver, Canada.
    Posts
    5,120

    Default

    >>>because the bleach9.9 is not giving me satisfaction, I try to put the prep7.7 directly on the seat with no paper towel, wait 2 hours and brushe it with the >>>horsehair brushes and it seems to give me good results.
    >>>what do you think about this approach ?


    What you are trying is one of the approaches with similar objective – let the product penetrate, lubricate and suspense the stain, then extract before it dries up. Dripping a few drops of water and horsehair agitate it help release the stain as well. You can repeat the process to your satisfaction.

    Let see some pictures.

  22. #22
    Join Date
    Apr 2013
    Posts
    12

    Default

    the untreated part of the seat:
    Name:  IMG_0649.jpg
Views: 1211
Size:  1.54 MB


    the trated part of the seat:
    Name:  IMG_0651.jpg
Views: 1202
Size:  1.62 MB


    zoom 1:
    Name:  IMG_0652.jpg
Views: 1221
Size:  1.91 MB


    zoom 2:
    Name:  IMG_0653.jpg
Views: 1177
Size:  1.99 MB

  23. #23
    Join Date
    Feb 2007
    Location
    Greater Vancouver, Canada.
    Posts
    5,120

    Default

    These pictures show some finish removal at several places, thus Bleach-9.9 should not be further used.

    Alternative to salvage the situation with refinishing becomes unavoidable.

    However, most of the stain has to be removed, otherwise it will wick through the new finishes.

    Recommended refinishing is accomplished with this sequence of process:

    1. Strip remaining stained finishes with Stripper-2.3.

    2. Leather structure rejuvenating with Hydrator-3.3 follows with Fatliquor-5.0

    3. Adhesion coating with Adhesor-73.

    4. Matching color coating with Pigment-64.

    5. Top coating with PigTop-64 to match existing luster.

    6. Rub-Resistant protection with Protector-B+

  24. #24
    Join Date
    Apr 2013
    Posts
    12

    Default

    hello,

    I think the picture above show you the best result that I can reach.
    Cause each time I try to use prep7.7, it seems that I create some "finish removal" at other places...

    what should I do ?
    what about the other product ?

  25. #25
    Join Date
    Feb 2007
    Location
    Greater Vancouver, Canada.
    Posts
    5,120

    Default

    >>>I think the picture above show you the best result that I can reach.
    >>>Cause each time I try to use prep7.7, it seems that I create some "finish removal" at other places...

    When the topcoat is no more there, the color becomes more vulnerable in any stain removal process such as this.

    >>>what should I do ?
    The tire stains has to be removed and it is much easier when used Stripper-2.3 or Acetone to remove them, even with the color for a refinishing.

    >>>what about the other product ?
    All other products are used according to the above (6) sequence.
    You may need Adhesor-73 and Pigment-64.
    Pigment-64 comes in White and to shade to match you may need 3 to 5 percent of black with optional Ochre.

    Email me for prices.

    Roger Koh
    [email protected]

  26. #26
    Join Date
    Apr 2013
    Posts
    12

    Default

    hello, update sorry for the delay...

    I just come back from a leather shop and the guy told me that my seat was not leather but sky....

    And he try acetone and it seems to give pretty good result if we don't mind doing "finish removal" (because we plan to paint it again).

    Does the the fact that my seat are in sky change anything in the invoice that you send me by email ?
    -->> I m not gonna need more prep7.7

    maybe this will be good and enough ? :
    Adhesor-73 250ml
    pigment 64 black 60ml
    pigment 64 white 250ml
    pigment 64 ochre 60 ??? <<--- why ?
    pigment top 64 250ml

    regards

    ben

  27. #27
    Join Date
    Feb 2007
    Location
    Greater Vancouver, Canada.
    Posts
    5,120

    Default

    “Sky” is new to me; do you have pictures of “finishes removed”?

    The stains have to be removed entirely; otherwise it may resurface through the new finish.

    This order works for simulated leathers as well including PVC.

    “Ochre” is the extra color that gives a warm glow to the white and is a common combination to off-white in this ratio.
    White = 90
    Black = 7
    Ochre = 3

    You have to make adjustment to your satisfaction from your end.

    Let me know your final changes to your order.

Thread Information

Users Browsing this Thread

There are currently 1 users browsing this thread. (0 members and 1 guests)

Posting Permissions

  • You may not post new threads
  • You may not post replies
  • You may not post attachments
  • You may not edit your posts
  •