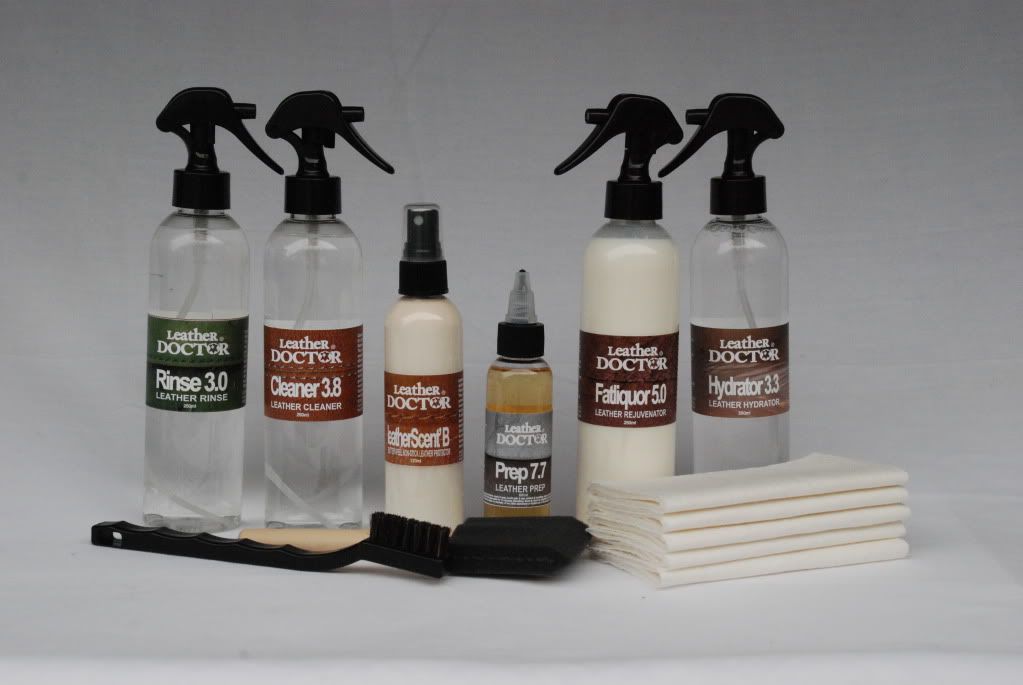
Results 1 to 21 of 21

Thread: How to keep my (with only 1500 miles) Ford F150 SVT Raptor leather seats "Soft" again?

  1. #1
    Join Date
    Feb 2007
    Location
    Greater Vancouver, Canada.
    Posts
    5,144

    Default How to keep my (with only 1500 miles) Ford F150 SVT Raptor leather seats "Soft" again?

    Ok my name is M… and I recently purchased a new Ford F150 SVT Raptor with leather front seats. This is the first new vehicle I have owned with leather. In the past I had just used Griot’s leather care for cleaning and conditioning. I did the same now but went to my local upholstery shop to have my center armrest done in leather and he seen my seats and told me I better get something on it cause the sides where the sun hit are getting hard and show lines already. The truck is my toy so not driven much and in sun not often, with only 1500 miles I am concerned on how to upkeep and get it soft again. I just used LEXOL as a cleaner and conditioner but not as soft as I would have liked or thought.

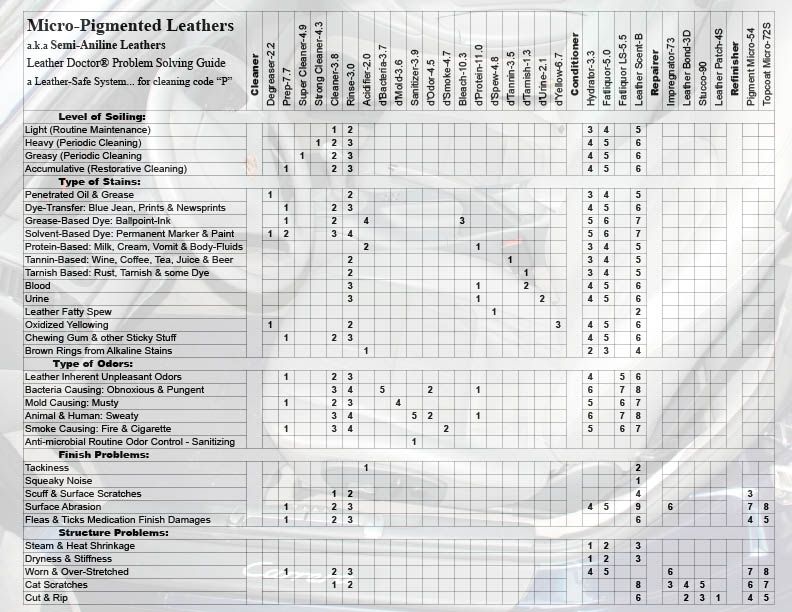
    I have read a bit on the forum and get confused, what do you suggest to use for cleaning and upkeep for long life and the process. Also how much 

    Note:
    The close ups are all of the driver side and mostly in the side bolster by door. Do remember it just got cleaned and coated with LEXOL about 4 hours ago

    Thanks M…


    #1


    #2


    #3


    #4


    #5


    #6


    #7


    #8


    #9

  2. #2
    Join Date
    Feb 2007
    Location
    Greater Vancouver, Canada.
    Posts
    5,144

    Default

    The seat shows a combination of three fabrics; the non-absorbent pigmented panel; the perforated panel and the velour panel.

    I believe we are only interested to solve the problem of the non-absorbent leather panel…”where the sun hits are getting hard and show lines already”…

    Leathers getting hard and showing lines are signs of diminishing fatliquor (fat, oil and water) that need to be replenish or rejuvenated.

    We basically need a “structure” conditioner that can get into the thickness of the leather to accomplish our task.

    The only access is through the reverse suede side; as the finish (color pigment and topcoat) has already sealed up the porous pores.

    The only way to do so is to check out with your local leather seat installer whether they can remove the leather for you to treat from the reverse side.

    If they can; then you could have your leather rejuvenated as soft as you wish that will also reduce the lines (coarse breaks).

    Let me know of your finding; if it is positive; then what you require is Hydrator-3.3 and Fatliquor-5.0.

    And I will further explain how you will go about doing it effectively.


    Roger Koh
    [email protected]
    Last edited by Roger Koh; 10-05-2010 at 06:28 PM.

  3. #3
    Join Date
    Oct 2010
    Posts
    22

    Default

    Well thats not the best news I wanted to hear haha, but will look into the possiblity of how hard it would be to remove it. My other question: is there one product that would work better for maintaining and cleaning the leather surfaces including the perforrated

  4. #4
    Join Date
    Oct 2010
    Posts
    22

    Default

    All the sides and that are you saying then all been sealed to good to have anyhting really get to the natural leather and condition?

    Thanks for your help!

  5. #5
    Join Date
    Feb 2007
    Location
    Greater Vancouver, Canada.
    Posts
    5,144

    Default

    Quote Originally Posted by MJN View Post
    Well thats not the best news I wanted to hear haha, but will look into the possiblity of how hard it would be to remove it. My other question: is there one product that would work better for maintaining and cleaning the leather surfaces including the perforrated
    Another option is an absorbency test to determine the possibility of moisture ability to penetrate the leather finish (colorcoat and topcoat) into the leather structure to rejuvenate it.

    What you need is a facial cotton pad soaked with Hydrator-3.3; place it on the leather finish and seal up with a transparent plastic cling wrap.

    This allows the hydrator-3.3 to only go one direction into the leather; depending on the porosity of the leather finish; may take an overnight dwell to see the result; if it works then you can smile.

    Leather surface or finish care comprise of “cleaning” and “conditioning”.
    Cleaning would depend on the level of soiling, extreme soiling would require Prep-7.7 follows by Cleaner-3.8 and Rinse-3.0.
    General cleaning on a routine basis requires Cleaner-3.8 and Rinse-3.0

    Conditioning here refers to protecting the finish with a non-stick buttery-feel protector; that also helps to reduce friction wear to the finish from rubbing and moving in and out of the car; and imparting a classic leather scent that is distinctly difference from a vinyl seat; that the scent of leather is more leathery than the leather itself.

    So I have mention four products as a leather-safe system for the leather surface; rather than from one bottle.

    Perforated leather structure becomes absorbent during wet cleaning; as the water evaporates from the structure its fibrils tends to stick together in the wicking process; resulting in leather stiffness.

    Therefore depending on the stiffness of leather; it is recommended to hydrate after rinsing and fatliquor it; so that when it dries the fibers will be lubricated and would slide over one another smoothly with suppleness.

    This is the recommended Leather Care Kit that matches the leather seat.


    2. Semi-Aniline Leather Care Kit S250.p
    Contents:
    Prep-7.7 - 60ml
    Cleaner-3.8 - 250ml
    Rinse-3.0 - 250ml
    Leather Scent-B - 120ml
    Hydrator-3.3 - 250ml
    Fatliquor-5.0 - 250ml
    Leather Brush-1 - 1pc
    3” Poly-Brush® - 1pc
    Washable Rags - 5pcs

    This guide helps to solve other leather problems.


    Roger Koh
    [email protected]

  6. #6
    Join Date
    Feb 2007
    Location
    Greater Vancouver, Canada.
    Posts
    5,144

    Default

    Quote Originally Posted by MJN View Post
    All the sides and that are you saying then all been sealed to good to have anyhting really get to the natural leather and condition?

    Thanks for your help!

    Leather has to breathe; and it is bad to have leather sealed that does not allow moisture to move in and out to regulate its moisture level (transpiration); that’s why you see more non-absorbent leather cracking; in these sealed leathers the fatliquor (fat, oil & water) from the leather structure continuous to evaporate as VOC (volatile organic compound) very slowly; but very difficult to get moisture into the leather structure from the surface; unless it's through the wear, micro-cracks, seams and needle holes.

    To improve coated leather transpiration it has to be perforated; like the center panel; with easier access to rejuvenate the structure.

    You would see full perforated panels in some makes like the BMW (an ideal innovative idea for better transpiration); that when lines and creases do developed; it's easier to access to the leather structure.

    Micro-Pigmented leathers in some luxury cars are semi-absorbent; thus makes rejuvenating possible.

    Napa-Pigmented leathers as in the "S" series is the most luxury of pigmented leathers.

    Otherwise the Ford King Ranch aniline leather is more luxury than the napa-pigmented leathers; closer to what leather is suppose to be – more natural and easily rejuvenate-able.

    Thus you would see that the greater the leather breathe; the more absorbent; able to be easier rejuvenated; the more expensive it is.


    Non-absorbent leathers; over protected or sealed leather becomes less natural; behaves like vinyl; less comfortable to seat – non rejuvenate-able means they have a shorter life-span; as the leather structure is quite impossible to be rejuvenated; unless from the reverse side.


    In order for stiff leather to be rejuvenated; it has to be hydrated prior to fatliquoring it; that is how it’s been done in the tannery world-wide; so it’s the same with the leather-safe Leather Doctor® system.


    Roger Koh
    [email protected]

  7. #7
    Join Date
    Oct 2010
    Posts
    22

    Default

    Roger just want to say that is some excellent info there. I started out knowing nothing about leather as I have been learing and appreciate all the help and advice.

    Im thinking first step of course find out the details on your kit you offer how much and also how to get, then try seeing if i can get them areas to take to the hydrator and then go from there.

    I just spoke to my guy that has done numerous interriors in cars and such and him beeing little "high strung" thinks that it will absorb and not have to worry about trying to remove the leather to condition the back, but time will tell and there is always other shops...lol

  8. #8
    Join Date
    Feb 2007
    Location
    Greater Vancouver, Canada.
    Posts
    5,144

    Default

    Quote Originally Posted by MJN View Post

    Im thinking first step of course find out the details on your kit you offer how much and also how to get, then try seeing if i can get them areas to take to the hydrator and then go from there.


    Check your email for the prices.

    Roger Koh
    [email protected]

  9. #9
    Join Date
    Oct 2010
    Posts
    22

    Default

    Roger I noticed in a old post on another forum you posted some pics aplying some of the product. In one the pics you were using the sponge brush and had the entire seat covered in a cream colored product. Which one or step was this and is that how much we are suposed to apply. Just asking cause doubt I would have ever put on that much but learning

  10. #10
    Join Date
    Feb 2007
    Location
    Greater Vancouver, Canada.
    Posts
    5,144

    Default

    A cream colored product refers to the fatliquor-5.0.

    It is meant to lubricate the thickness of the leather structure to impart softness, strength and suppleness.

    The correct level of fatliquoring is to pinch the leather in between our thumb and finger to see the oozing out of fatliquor (fat, oil & water) through the pores on absorbent leathers (non-absorbent leathers would be from the reverse suede side).

    The water contents will evaporate that provides the breathing space for the leather in the inter-fibriliary spaces within the leather structure.

    Even though leather feels dry to the touch, it has an average of 15% of water content by weight in relation to the leather, besides the fat, oil and other leather constituents that makes up the leather to give fullness to the leather.

  11. #11
    Join Date
    Feb 2007
    Location
    Greater Vancouver, Canada.
    Posts
    5,144

    Default

    Quote Originally Posted by MJN View Post
    and is that how much we are suposed to apply.


    See how much wetness leather need to go through in order to have the softness, in comparison to the spray I recommended.

    See this "Discovery Channel" video on Fatliquoring...


    http://www.leathercleaningrestoratio...ead.php?t=1772

  12. #12
    Join Date
    Oct 2010
    Posts
    22

    Default

    So when i get your products.

    Step one: Try the hyd and wrap in plastic to see if takes. If does how much of that to apply? Soak a cloth and lay over the seat and wrap all in plastic?

    Step Two: Brush entire seat in the fatliquor and then do I wrap to soak in again?

    Sorry to ask so many questions just trying to get it all figured out and prepared when ready to take it on.

  13. #13
    Join Date
    Oct 2010
    Posts
    22

    Default

    No wonder are leathers dry out, a person or at least me never relized how much of it it takes to keep the leather soft and supple or in its orginal state.

  14. #14
    Join Date
    Feb 2007
    Location
    Greater Vancouver, Canada.
    Posts
    5,144

    Default

    You have two different leather panels, perforated is easier to rejuvenate as it is also through these holes that the fatliquor dries up.

    The smooth coated leathers evaporates very slowly but it is difficult to rejuvenate from the coated surface; unless it has developed micro-cracks that may take some time; that’s the reason to do a patch testing (facial cotton pad soak in Hydrator-3.3 and cover-up with see thru plastic cling wrapper) to check for absorbency through these finishes; if it fail to absorb, then probably have to wait after 6 months to a year’s time. Otherwise just do along the needle holes or seams as these are the areas that the fatliquor drying takes place.

    In the meanwhile you could just rejuvenate the perforated panel first.

    The application is best to use a foam brush and let the leather takes its time to absorb them without unnecessary wasting the product not getting into the leather structure. The soaking with towel and covering up preventing evaporation is to make sure that the product goes one way, and not evaporate into the air. Whichever method suits best; the main objective is to hydrate the leather structure. And if the structure can be hydrated, it will be able to be fatliquored to as soft as you wish with strength and suppleness.

    Step Two is the repeat of step one for the fatliquor to follows where the hydrator have gone; so to speak the hydrator is the fatliquor’s preconditioner.

    Note:
    It is easier to hydrate on the horizontal level than the vertical level, as liquid flows downwards; that’s another reason for the towel/tissue with cling wrapper application.

    Roger Koh
    [email protected]

  15. #15
    Join Date
    Mar 2011
    Posts
    1

    Default

    i love and always use 303 aerospace protectant...

  16. #16
    Join Date
    Oct 2010
    Posts
    22

    Default

    Roger:

    Should I before i try to test with the hyd on the seat and treat the perforated section clean the seat to get any of the LEXOL off. As far as dirt and soil my seats look the same as they do in the pics and clean.

  17. #17
    Join Date
    Feb 2007
    Location
    Greater Vancouver, Canada.
    Posts
    5,144

    Default

    Leather rejuvenation is for the structure thickness beneath the finish coating, of course the surface could be clean first rather than last if there’s a need.

    Remember that hydrating is to relax the leather structure and reduce surface tension. It’s to precondition the leather, making way for fatliquor to be easily redistributed once it reached the leather structure. Hydrating is also to help reduce or remove unwanted creases if any with the help of cross stretching by hand and gives you a visual impact on how the fatliquor would reach those areas like creases and wrinkles. If hydrator cannot reach these areas, it’s clear that the fatliquor wouldn’t as well, so these unreachable areas would not be soften up. Therefore dwelling with covering up with clear cling wrapper (as used for wrapping foodstuff) up to 1-2-3 days will help to reach the entire panel to be followed up with fatliquor.

    It easier to hydrate the center perforated panels but to the non-perforated side panels, the only entry is by the needle holes. A technique is to place a soak-up of cotton wool or tissue, acting as reservoir for the hydrator to be slowly being absorbed along the needle holes until the entire panel is thoroughly hydrated. The same technique is then followed by fatliquor. Sure, before the fatliquor can be absorbed by the leather structure again, hydrator needs to be evaporated to leave space for the fatliquor while still damp. Subsequently at regular evaporating damp interval fatliquor is replenished, until a saturating point averaging 14% when dry is the universal tannery standard for fatliquor processing.

    Check with Hydrator-3.3, when surface Fatliquor-5.0 strays turns milky drive the milkiness into the leather structure again until surface hydrator is clear. When surface is dry apply Leather Scent-B, the rub-resistant protector.

    Roger Koh
    [email protected]
    Last edited by Roger Koh; 04-04-2011 at 10:42 PM.

  18. #18
    Join Date
    Oct 2010
    Posts
    22

    Default

    Thanks Roger. I tested a spot with a tissue paper on the middle section and of course like you said that took fairly quickly with a cover of cling wrap over night. Not sure how long it actually took because I went to bed after but by morn the tissue was dry.
    I also tested a spot on the side bolster by about the hip area, I layed the tissue over so it covered some the stitching and also on the leather itself. After the one night I still had not seen any progress of it, looking like was not going to take. Went to work and checked that evening and appered to be little less but still could see under the cling wrap where the tissue was not even it looked damp. Now this morn I checked it and it is dry, the tissue and the area around it even where the tissue was not and just was wet. So as of right now im happy and this weekend will be starting the process. First I was thinking of using the cleaner 3.8 on it first just incase, but after reading the bottle I do not have any visable soiling, stains, dirt or anything to that matter. Would I be better just to do the rinse 3.0 to nutralize anything? or ok to hit it with the hydrator and start? Thanks! Going to be a slow process but excited for the end result

  19. #19
    Join Date
    Feb 2007
    Location
    Greater Vancouver, Canada.
    Posts
    5,144

    Default

    It seems that you are not too sure about the leather surface.

    Test it out for certain how clean is clean to the original OEM leather finish by using the Prep-7.7 with a cotton swab on the driver seat – apply on a circular motion not bigger than a dime size, leave it 15 minutes and clean off the sticky residue with Cleaner-3.8 follows with Rinse-3.0. Check it when dry to see any difference in cleanliness.

    You can decide after the test whether you should clean prior to rejuvenating the leather.


    Roger Koh
    [email protected]
    Last edited by Roger Koh; 04-07-2011 at 08:13 AM.

  20. #20
    Join Date
    Oct 2010
    Posts
    22

    Default

    Well i ended up just cleaning the seat with the rinse and went from there. I first started with the middle perforated section and could almost watch it suck up the hydrator. I did that step twice and then applied the fatliquor and it got milky white just after a little bit of being on the surface. I then took the sponge brush and worked it into the surface till really could not see anymore liquid left and itis drying as of right now while other areas are covered soaking in hydrator.

    How many times do I want to apply the hydrator, is there a set amount of times or is just about two soakings good before applying the fatliquor? So far the middle sections are alot softer and look richer then the other seat that has been untouched. At this rate will need another bottle of the hydrator soon Also I figured I would wait and when the entire seat was done I would apply the top coat or should I do the sections as i finsh them and how soon do I want to apply it after the fatliquor?

    Thanks Roger so far looking good

  21. #21
    Join Date
    Feb 2007
    Location
    Greater Vancouver, Canada.
    Posts
    5,144

    Default

    Sufficient soaking and dwelling with Hydrator-3.3 objective in this case is to relax the crease or wrinkle leathers and reduce its presence; thus effective soaking allows the leather to be stretch or massage crosswise to eliminate the unwanted creases and wrinkles prior to fatliquor it.

    I believe you are talking about the non-stick, rub resistant protector – leather Scent-B. You can apply this Scent-B all at one go after Fatliquor-5.0 with the foam brush to avoid over-spray.

    Roger Koh
    [email protected]

Thread Information

Users Browsing this Thread

There are currently 1 users browsing this thread. (0 members and 1 guests)

Posting Permissions

  • You may not post new threads
  • You may not post replies
  • You may not post attachments
  • You may not edit your posts
  •