Leather-Safe Problem Solving Guide (A.w) Aniline Wax Pull-up Leathers
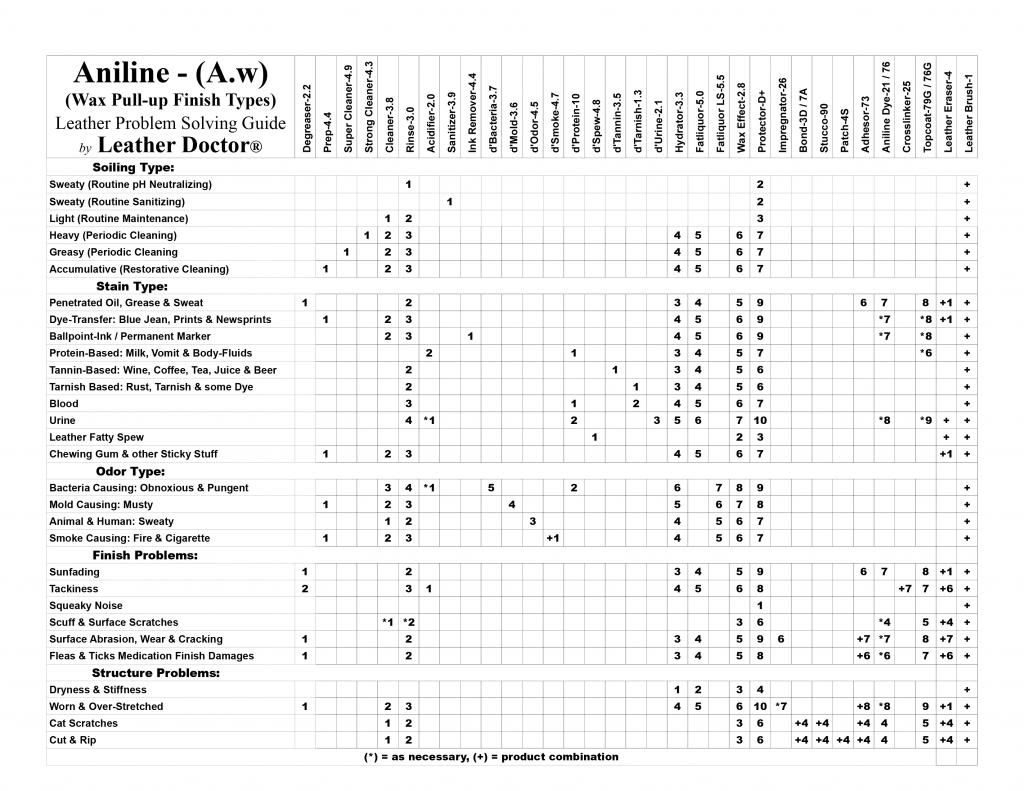
This Aniline Wax Pull-up Leather Problem Solving Guide will be used as reference to your problem.
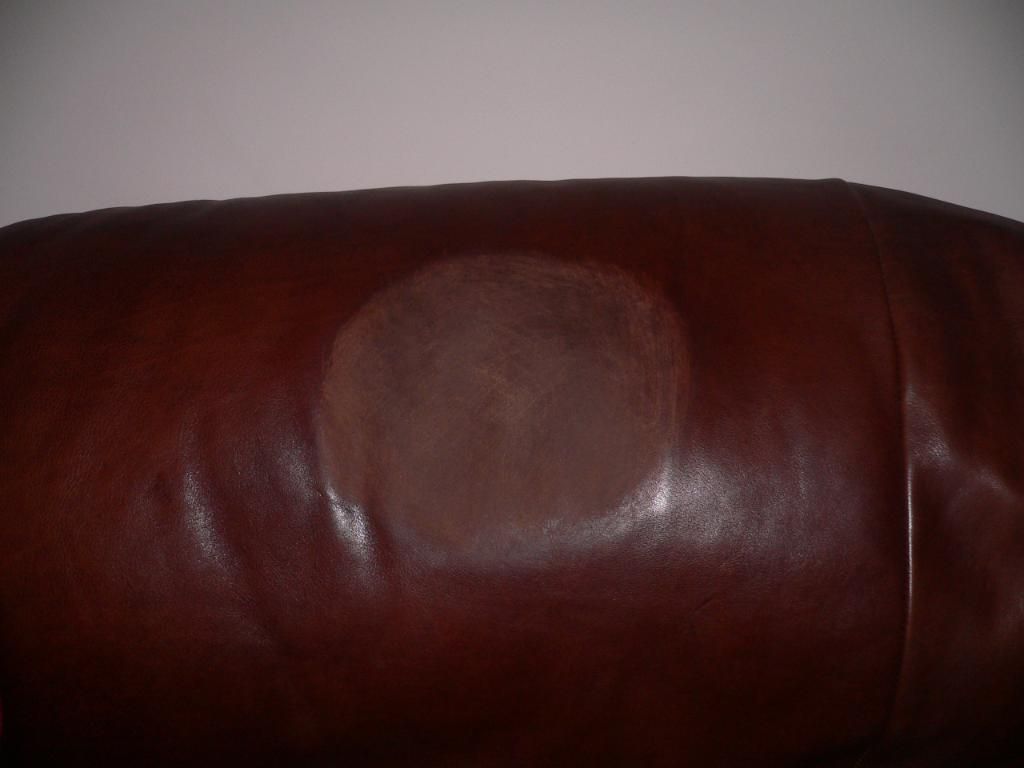
The left column is where an inspection besides the major armrest problem is determined.
The top across are the recommended products for the problem.
The numbers indicates the sequence of process.
The general sequence of process can still be further condense into 1] Cleaning, 2] Conditioning, 3] Repairs & 4] Refinishing.
Cleaning and stain removal ends at Hydrator-3.3 where a final inspection takes place and all stains that can be removed should be done during the wet phase. This cleaning would include existing topcoat removal to reduce uneven dye absorption during the dyeing process. A dry inspection after the surface has gone over with leather Eraser-4 will decide, if it is ready to accept dyeing.
Unlike a straightforward dyeing from new leather in the tannery, aniline is usually stain dye deep into the leather. The result of stain dyeing is still unpredictable as when the original leather has uneven grain tightness that differs from part to part of hide it may show what is known as a savage look.
A used leather going through a tannery standard re-dying process has the problem of uneven wear to the topcoat that will impede the dye to stain with an even appearance as well. It is during the wet cleaning process that will reveal most of the time where the topcoat has wears off. This unevenness of appearance has to be even out by removing the topcoat, so that new application will take on a more even appearance. It is also during the wet stages where leather-safe solution (pH 3 5) is used that strengthen the leather and weakens the topcoat that makes removal easier than when dry. The blotchy wet darkening effect if any will show where the existing topcoat should be removed. Alternatively, if removing the existing topcoat proves tedious, a coating dyestuff is used instead. Then Dye-76 is used instead of Dye-21.
When penetrating Dye-21 is to be used for very even absorption leather as observed during the final Hydrator-3.3 phase while checking for surface tension as well, the finishing process should follows this sequence.
1] Check that all stains are caught by tissue paper wrap, otherwise decide what reclean need to bring out penetrated stain with final Hydrator-3.3 tissue paper check when dry.
2] Dry Preparation This done to smooth any surface rough to the touch especially to the micro or macro crack areas.
3] Structural Repair This is accomplished with Impregnator-26 to tighten up the loose grains.
4] Dyeing is done best by spraying for easy control of intensity of color build-up.
5] Fatliquor-5.0 Replenish This application will soften and strengthen up the leather when dry.
6] Wax Effect-8.6 Replenish This application will restore the pull-up effect.
7] Adhesor-73 is to ensure that the topcoat have proper adhesion over the wax effect surface.
8] Topcoat-79G adds the gloss and amplify the intensity of the appearance further.
9] Protection-B+ is recommended to reduce friction wear.
When Dye-76 is used instead for coating over existing topcoat the sequence should be as recommended:
1] Check that all stains are caught by tissue paper wrap; otherwise decide what re-clean need to bring out penetrated stain with final Hydrator-3.3 tissue paper check when dry.
2] Dry Preparation This done to smooth any surface rough to the touch especially to the micro or macro crack areas.
3] Fatliquor-5.0 Replenish This application will soften and strengthen up the leather when dry.
4] Wax Effect-8.6 Replenish This application will restore the pull-up effect.
5] Structural Repair This is accomplished with Impregnator-26 to tighten up the loose grains.
6] Adhesor-73 is to ensure that the topcoat have proper adhesion over the wax effect surface.
7] Dyeing is done best by spraying for easy control of intensity of color build-up.
8] Topcoat-79G adds the gloss and amplify the intensity of the appearance further.
9] Protection-B+ is recommended to reduce friction wear.
I hope that this preview will give an idea of the entire process with no surprises.
If you have any question from understanding the guide?
Roger Koh
[email protected]